Crochet Stitches: A Complete Visual Guide
Every crochet project is built from a small handful of crochet stitches, repeated and arranged. This visual guide covers all of them — from your first chain to textured, decorative, and advanced techniques — with a photo and plain-English how-to for each.
Updated June 2026 · 12 min read
What are crochet stitches?
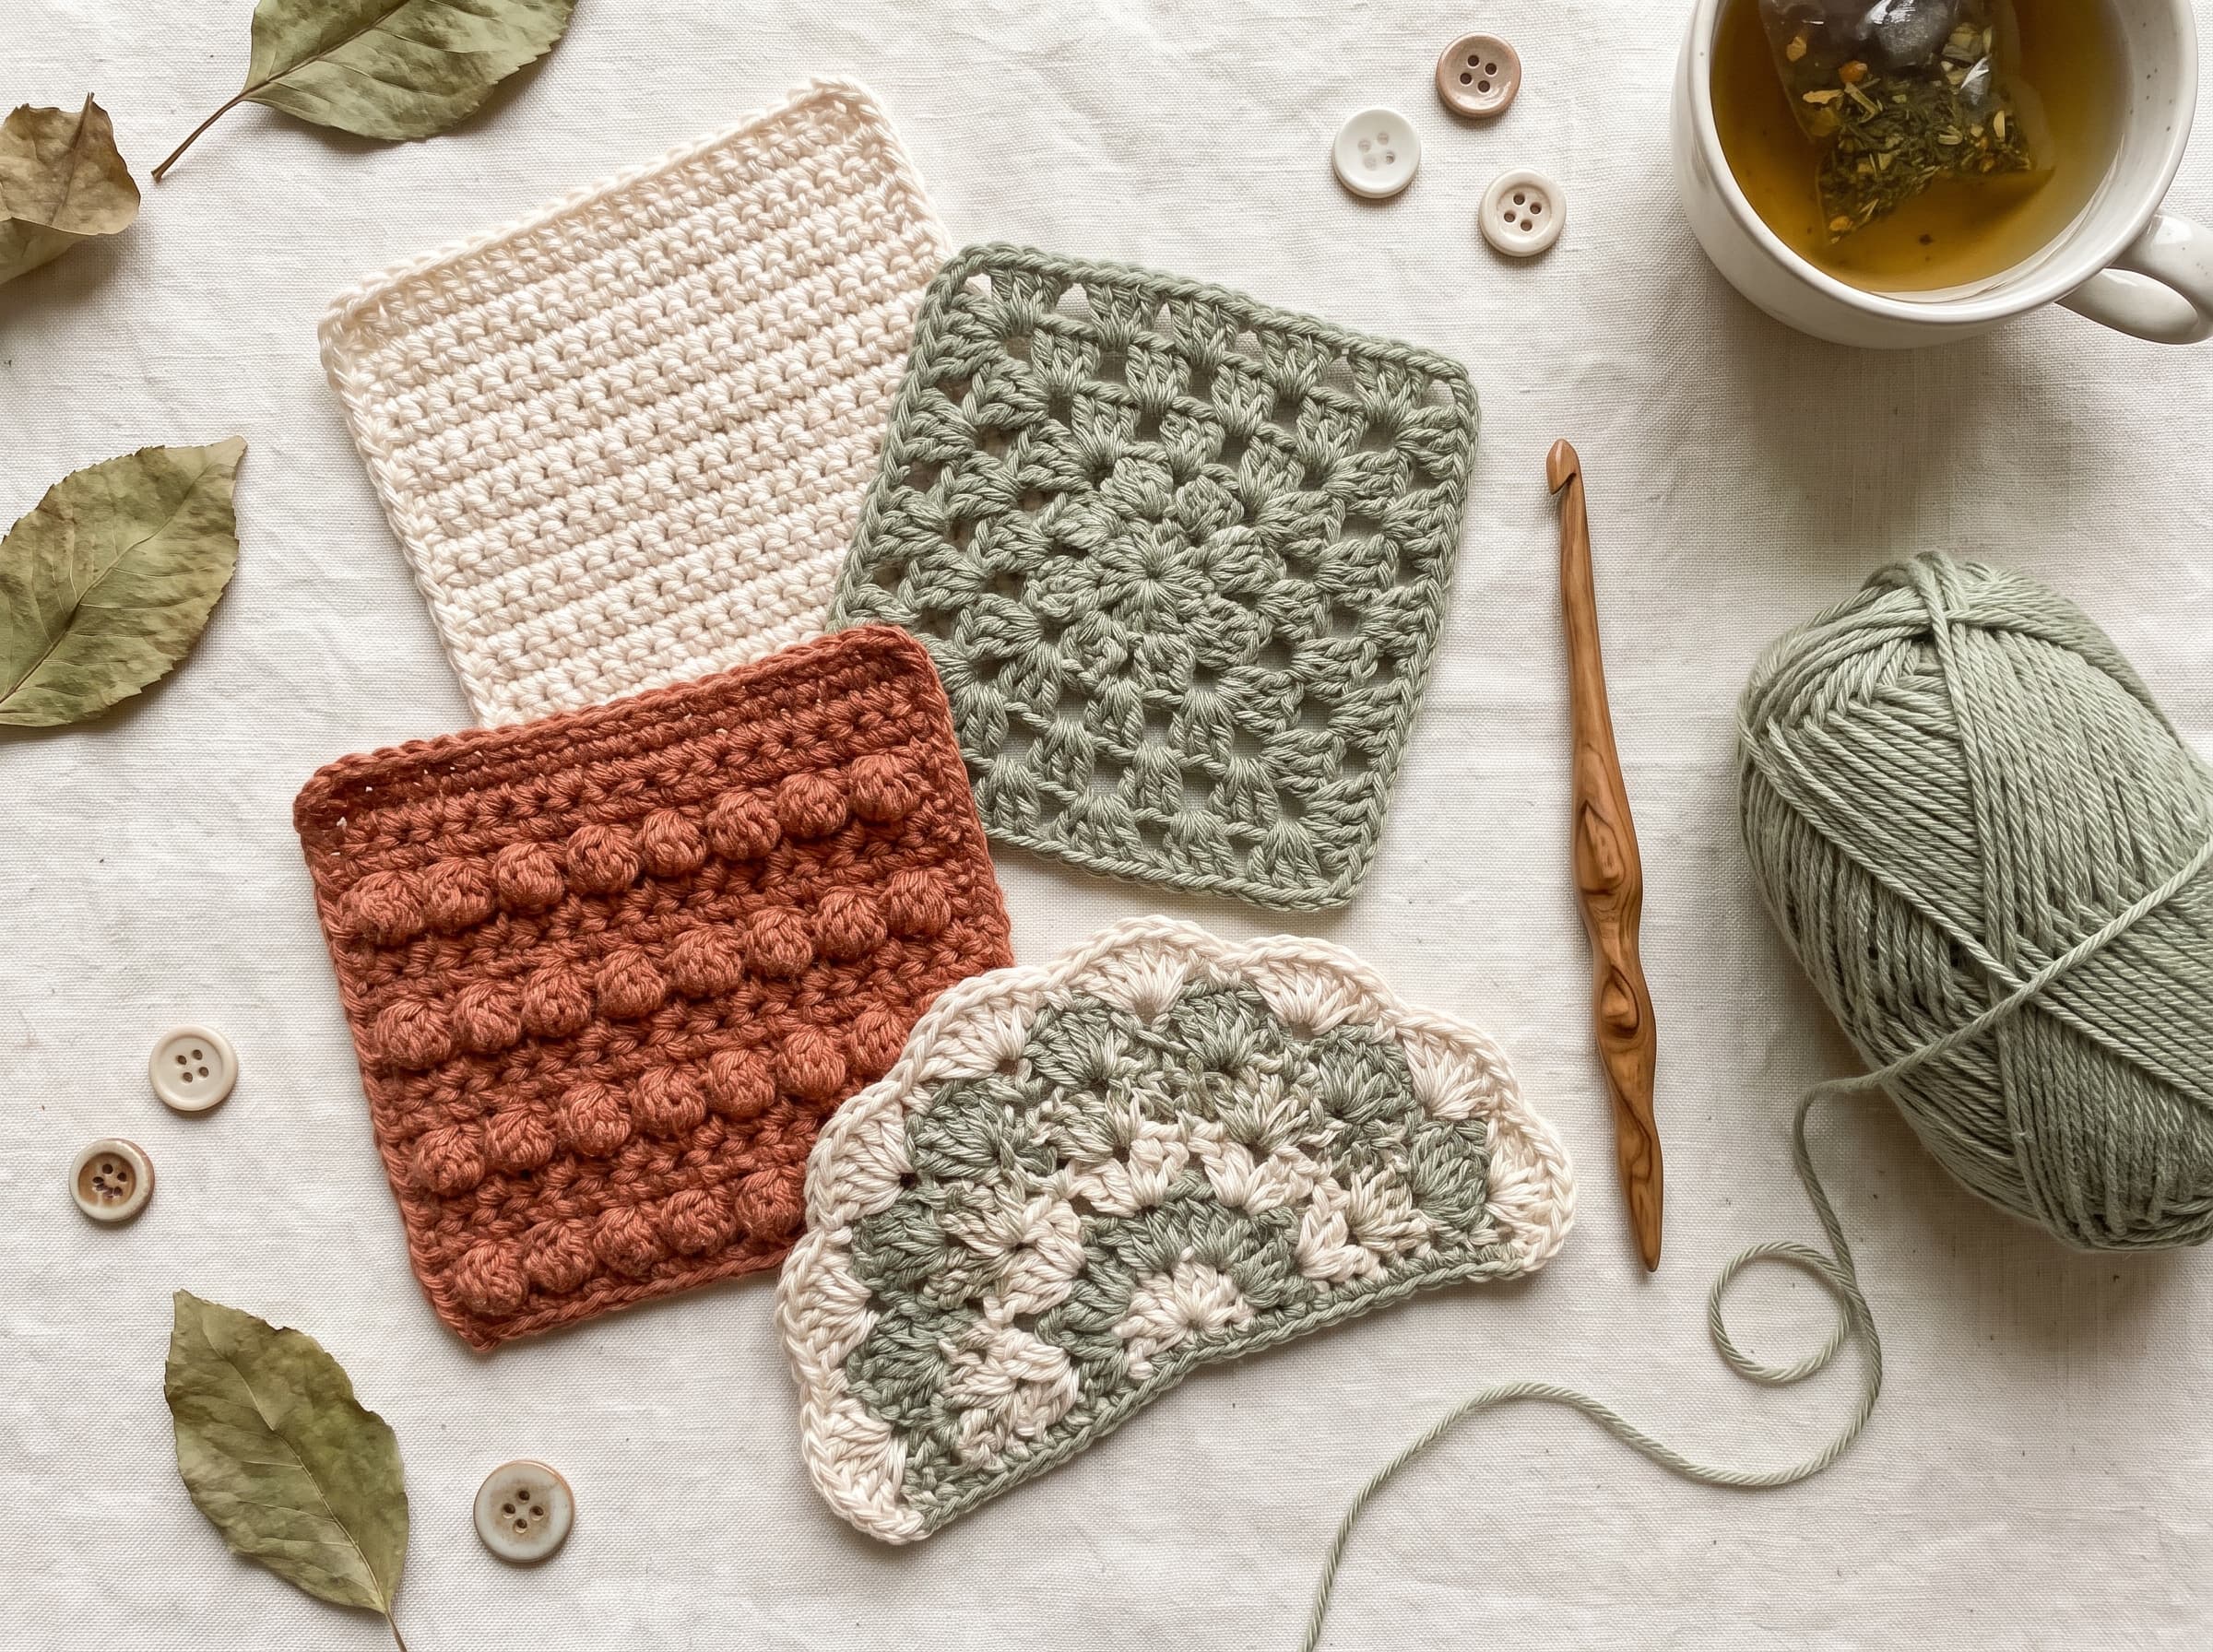
A crochet stitch is just a loop of yarn pulled through another loop with your hook. That’s it. Repeat that idea a few different ways and you get every blanket, sweater, and tiny stuffed animal you’ve ever seen.
Here’s the part that should make you exhale: there are really only a few stitches to learn. The fancy stuff is those same stitches, rearranged.
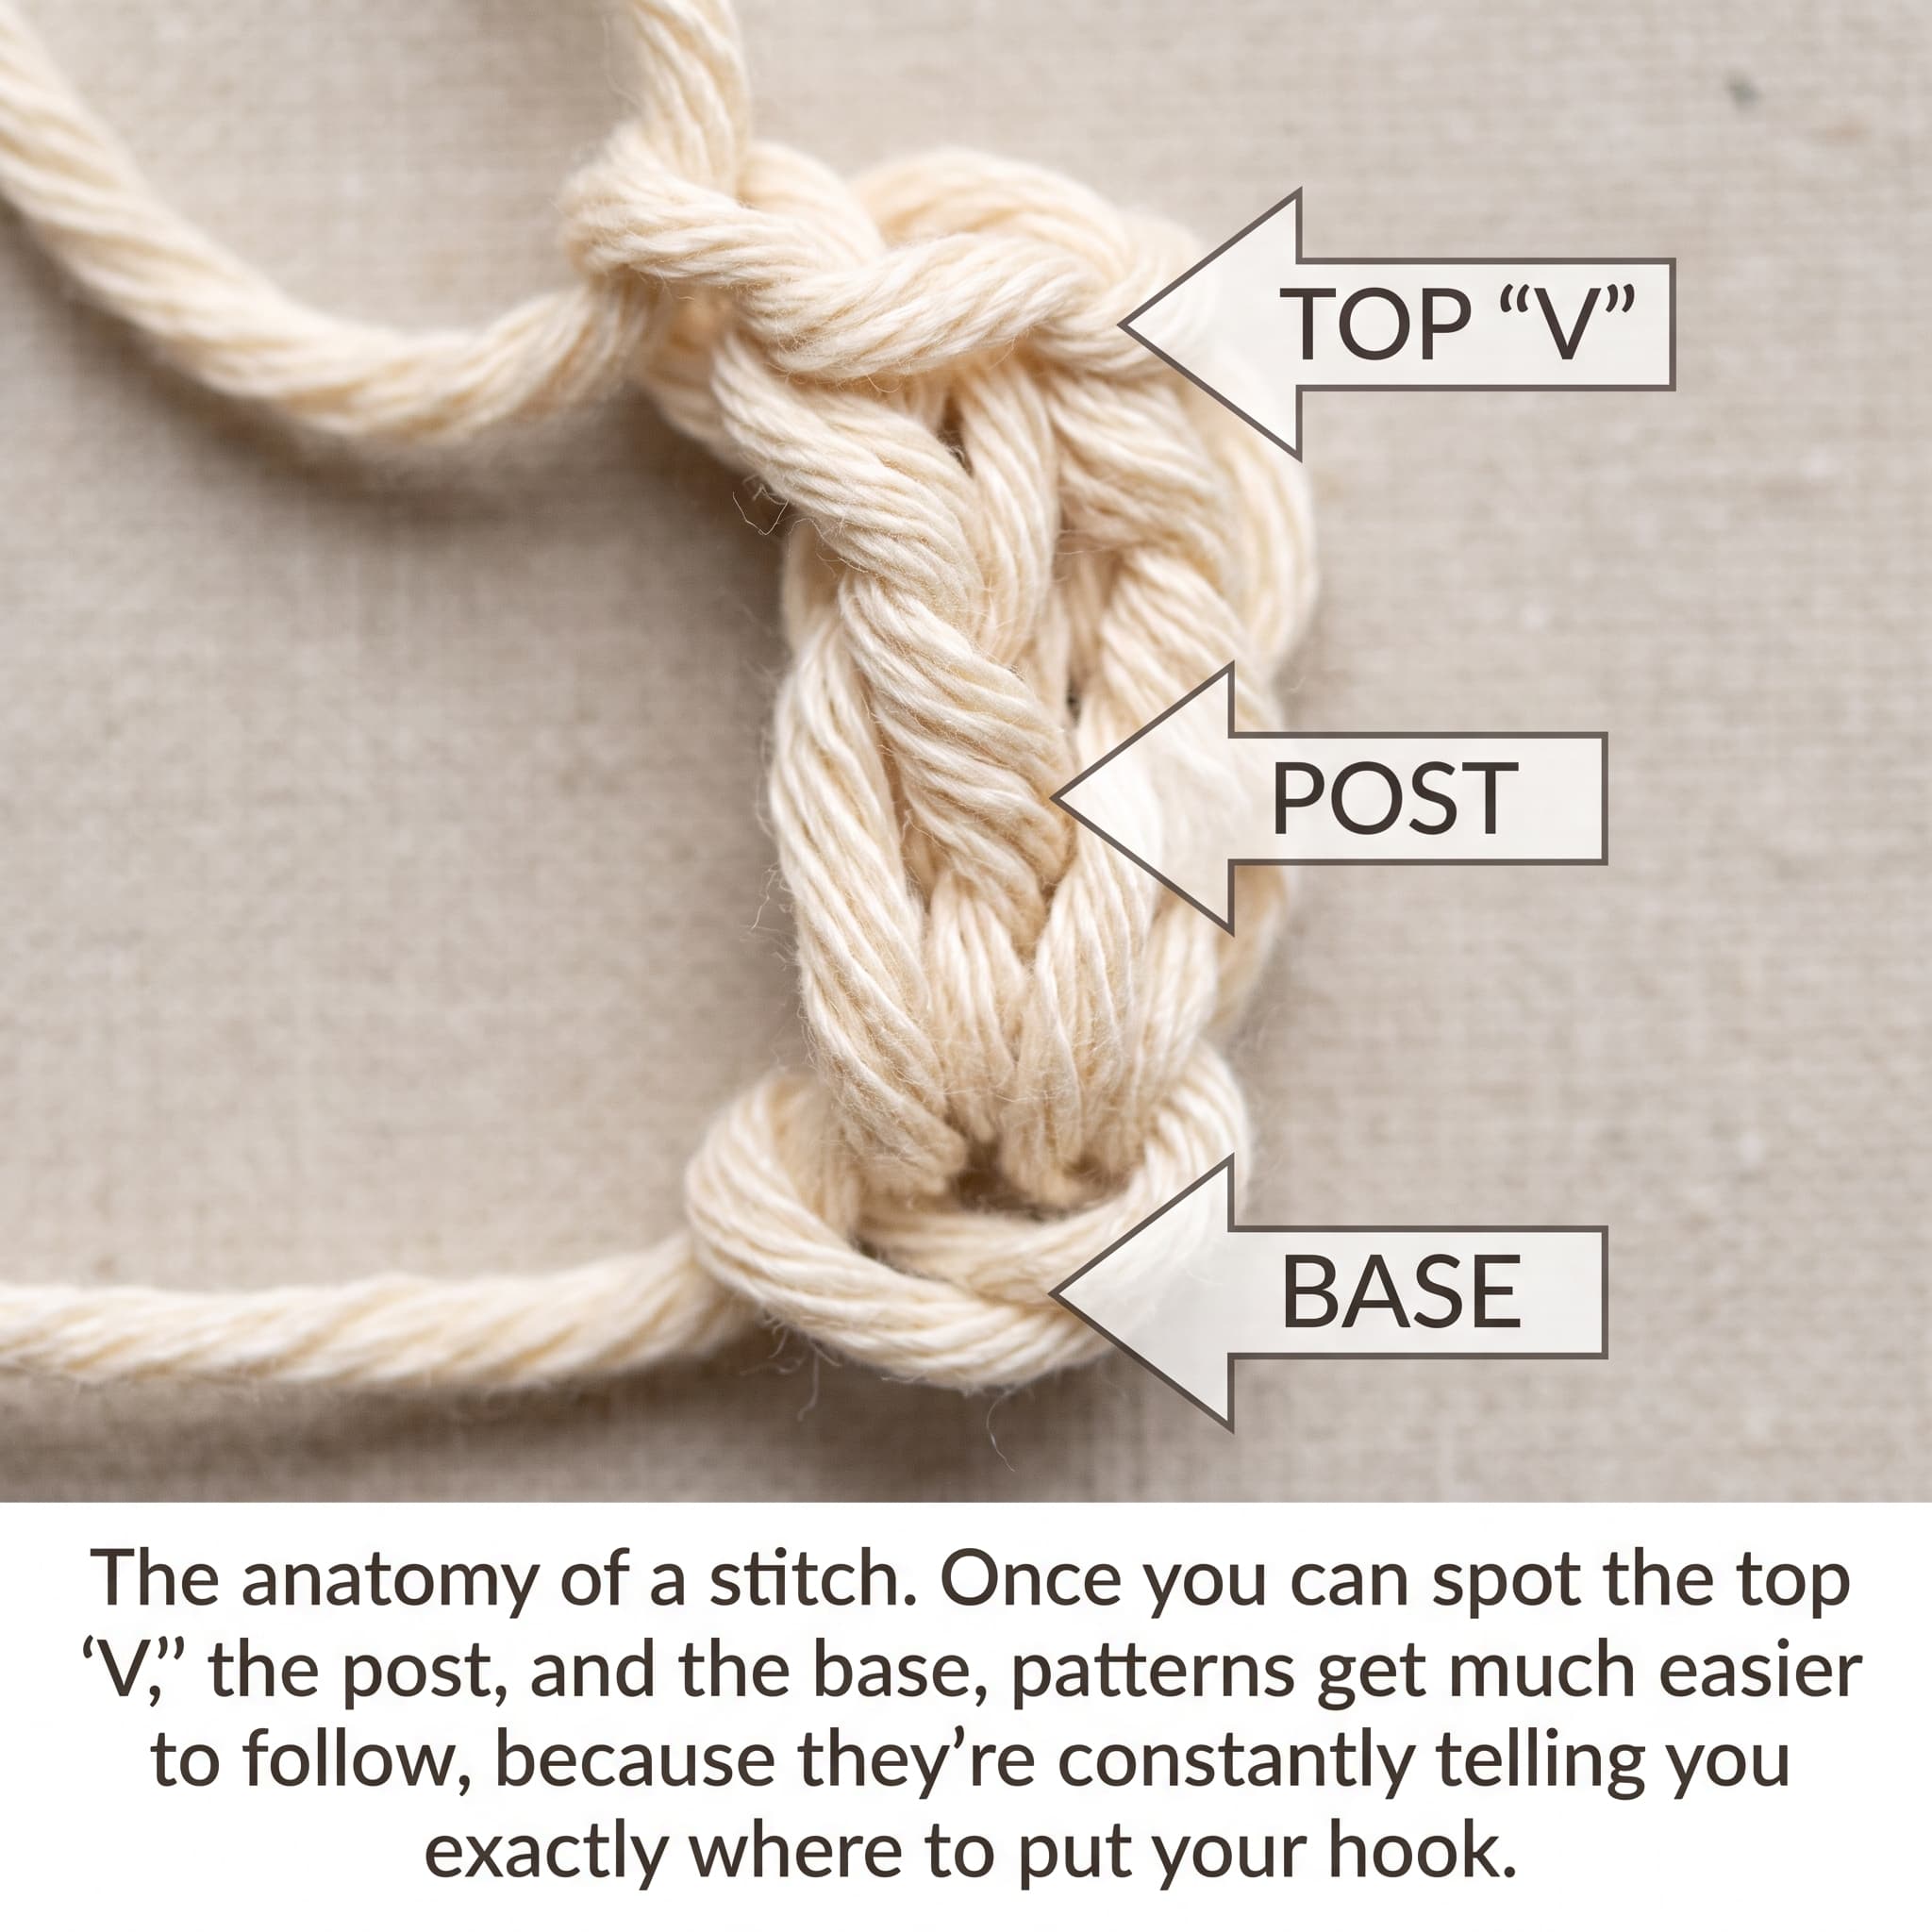
Once you can spot the parts of a stitch, patterns stop looking like code. But first, the one thing that trips up almost everyone, and it’s got nothing to do with skill.
US vs UK crochet terms (check this before any pattern)
Heads up: there are two naming systems, US and UK, and they use the same words for different stitches. A US “double crochet” isn’t the same as a UK one. Mix them up and your project quietly comes out wrong.
Good news: the names just shift up by one. See it once and it sticks.
| US term | UK term |
|---|---|
| Single crochet (sc) | Double crochet (dc) |
| Half double crochet (hdc) | Half treble (htr) |
| Double crochet (dc) | Treble (tr) |
| Treble crochet (tr) | Double treble (dtr) |
| Double treble (dtr) | Triple treble (trtr) |
| Slip stitch (sl st) | Slip stitch (ss) |
The word for tension differs too. What US patterns call gauge, UK patterns call tension.
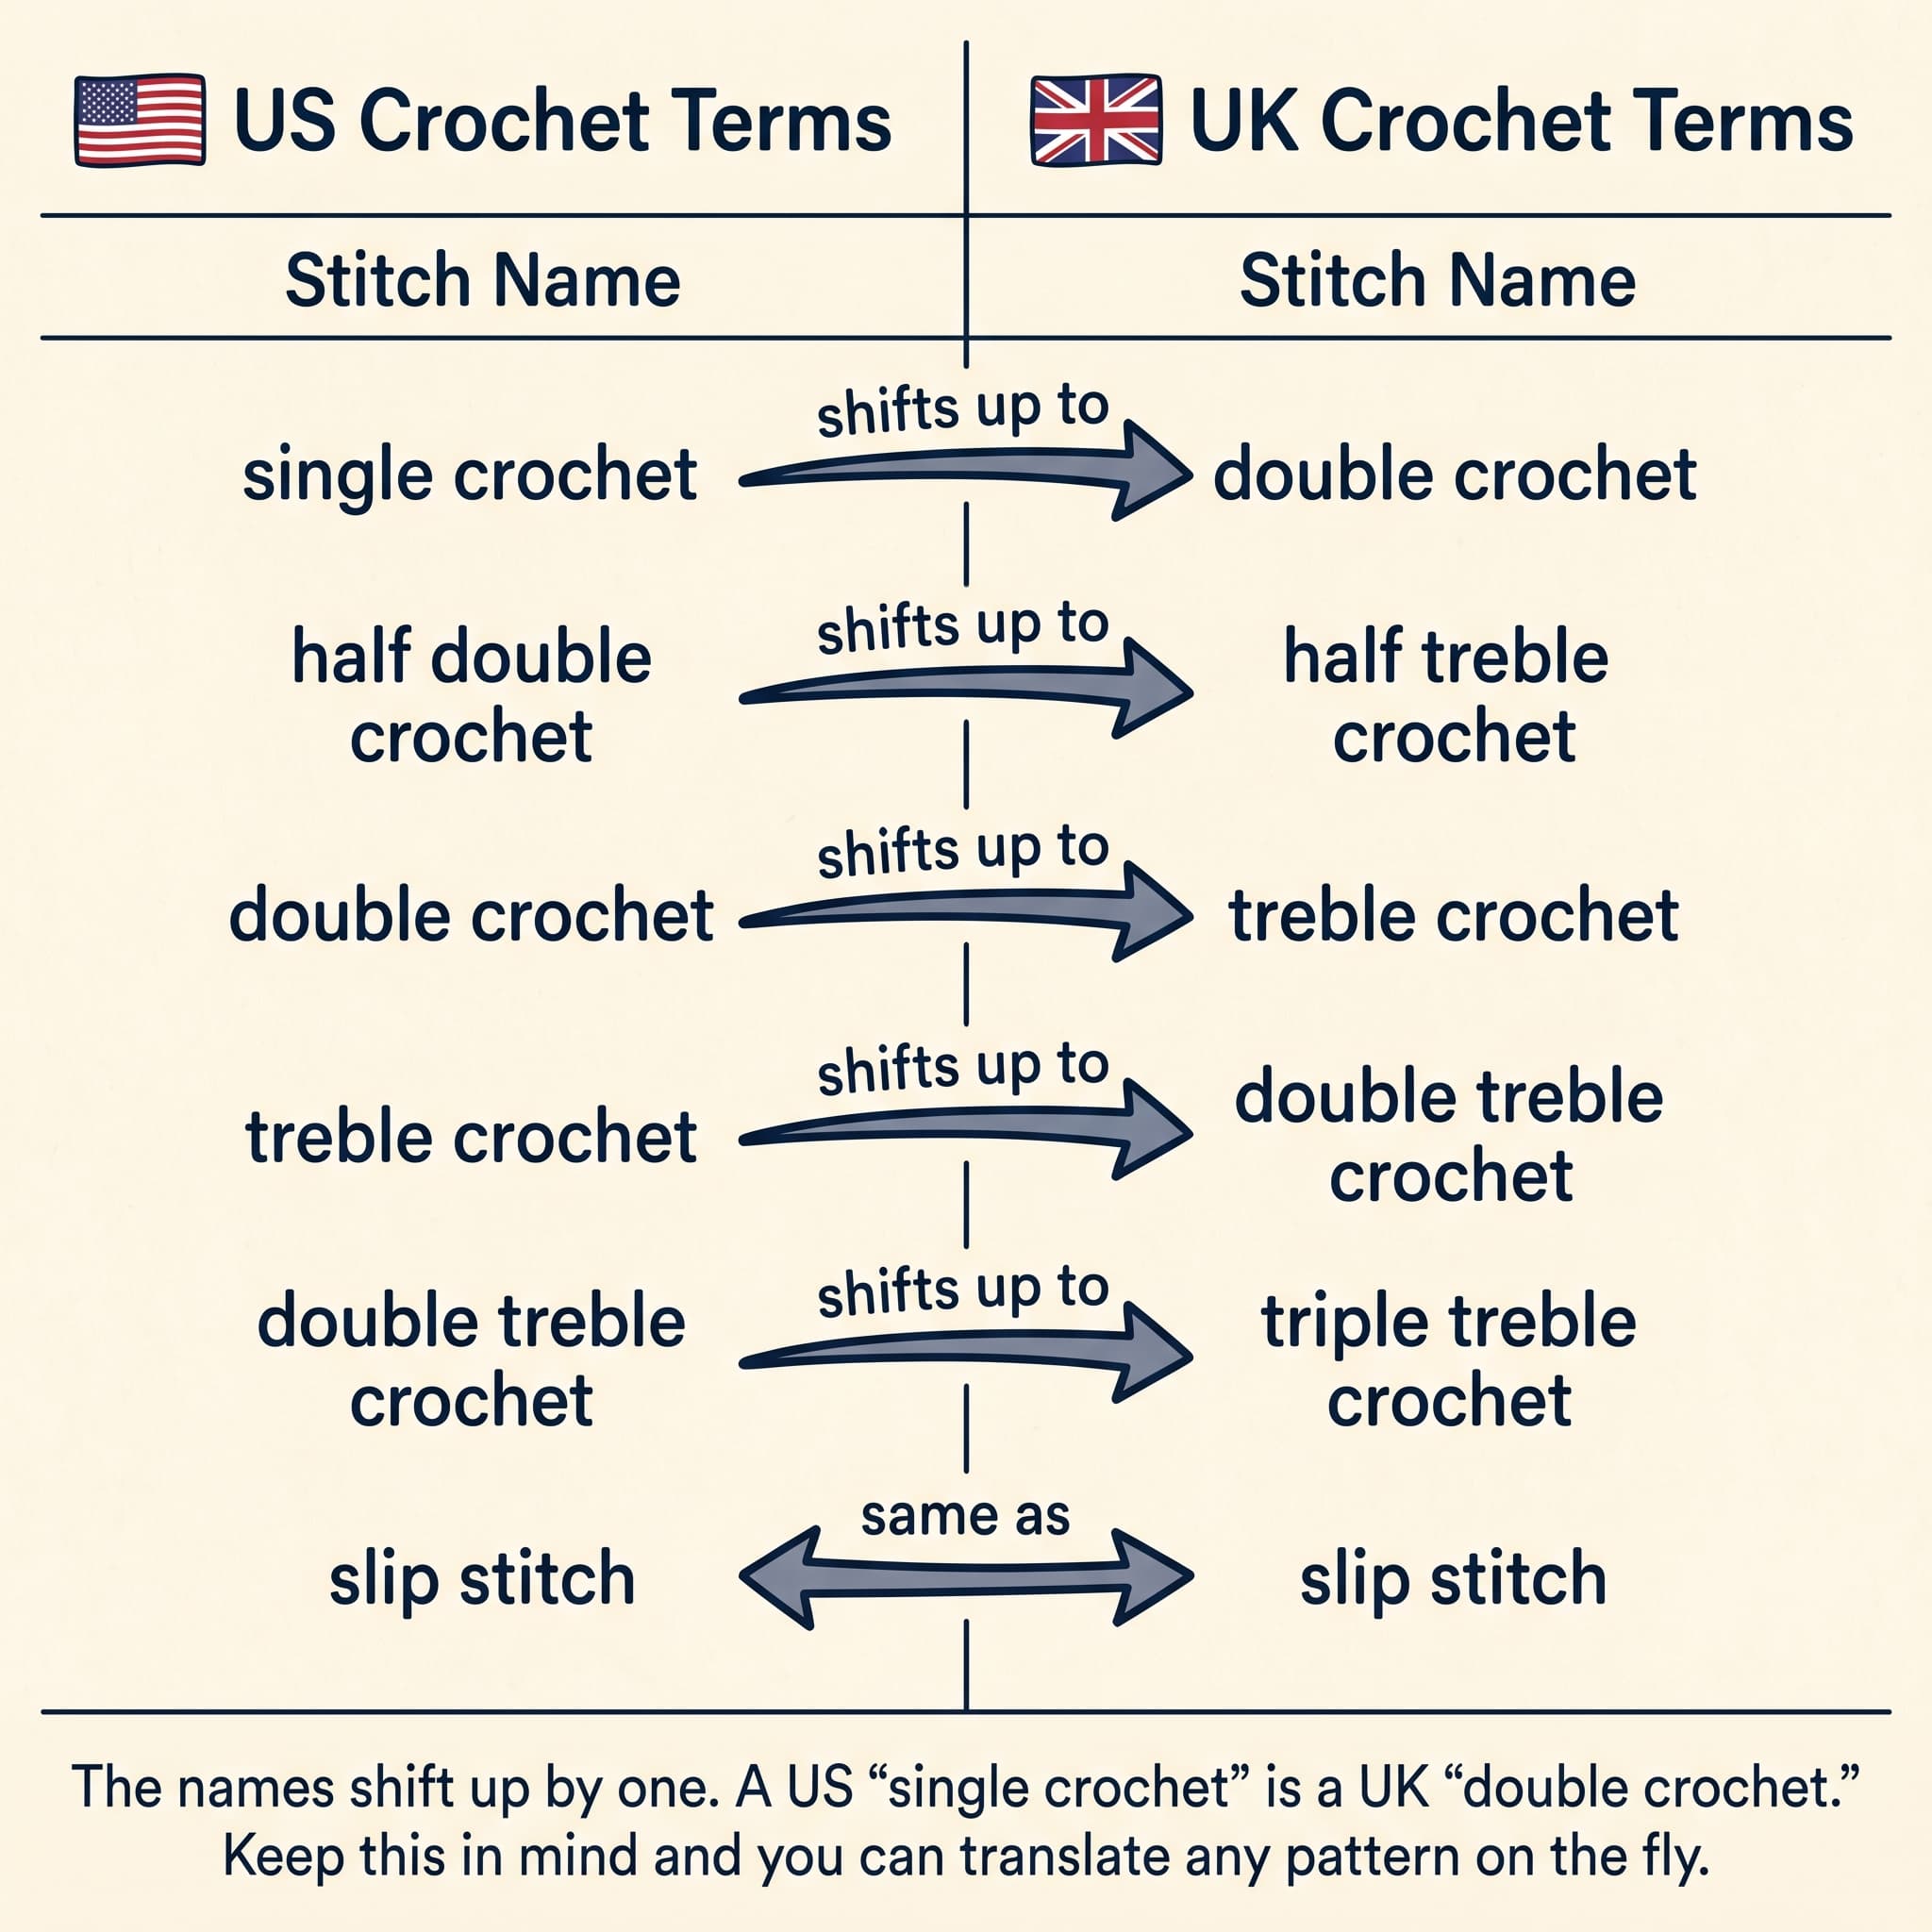
Every tutorial here uses US terms (the most common online), with the UK name noted where it helps. Now, where every project starts: the chain.
Before you start: hook, yarn & how to hold them
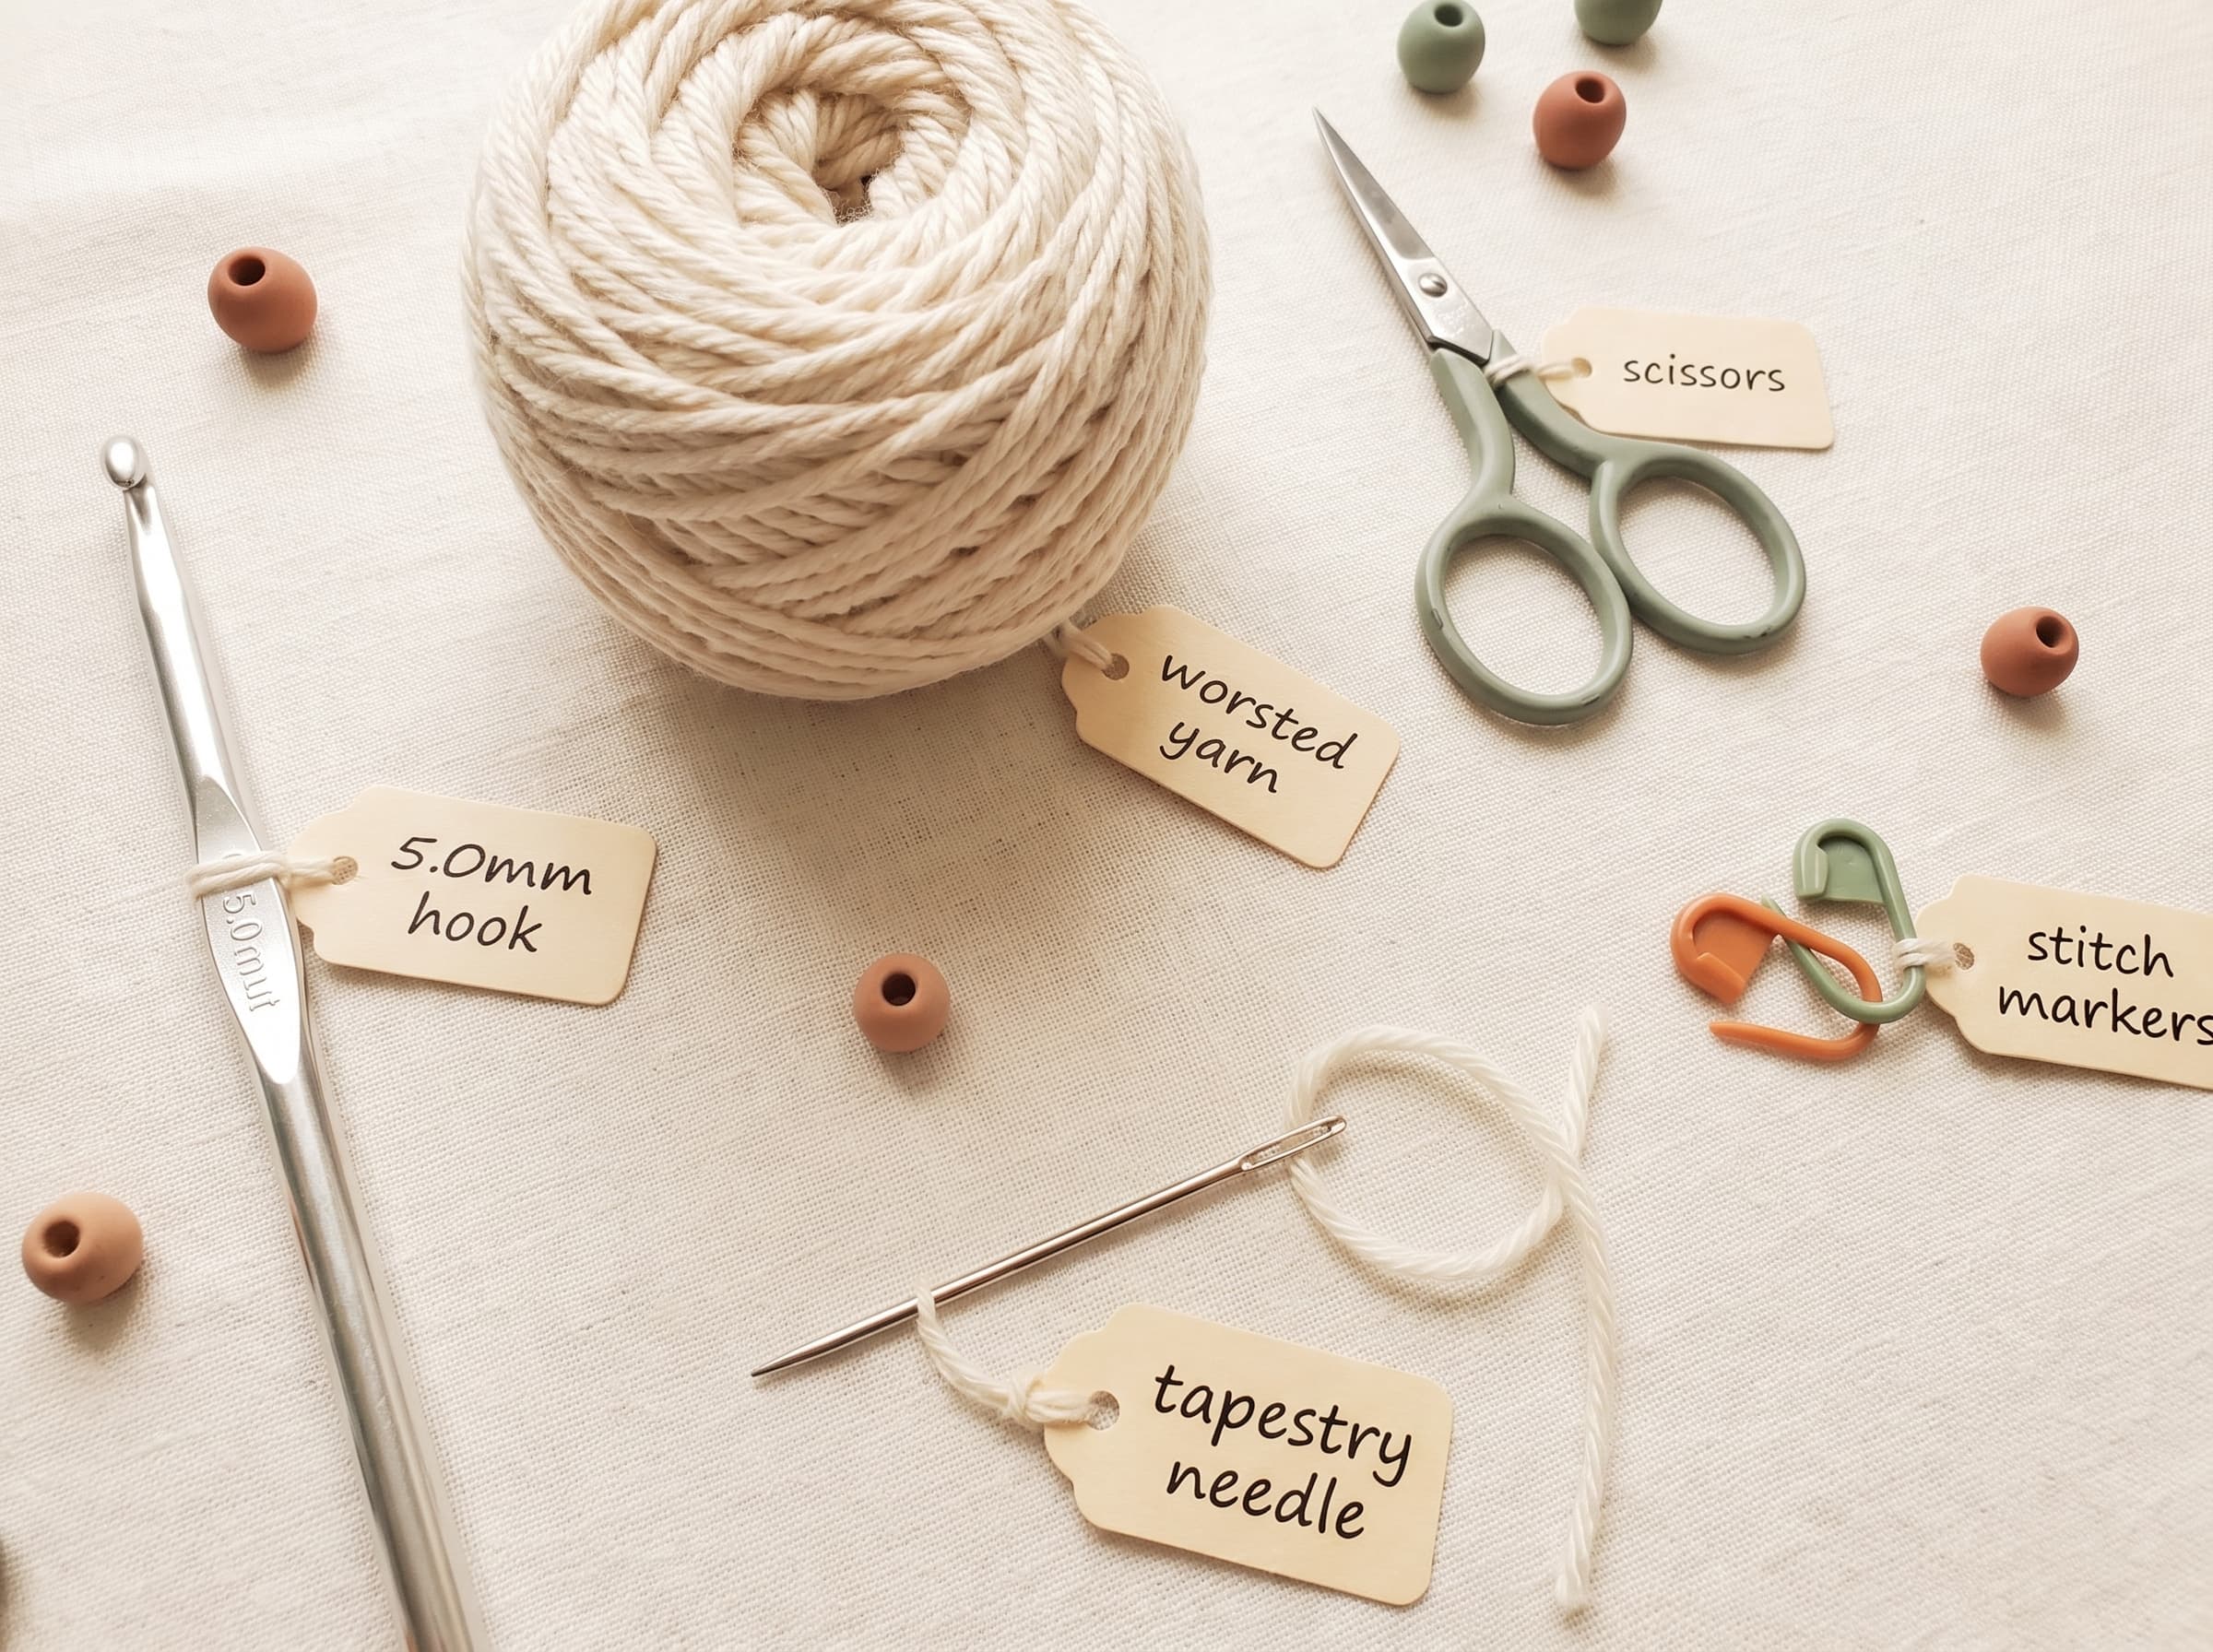
You don’t need a craft-store haul to begin. Five things and you’re set.
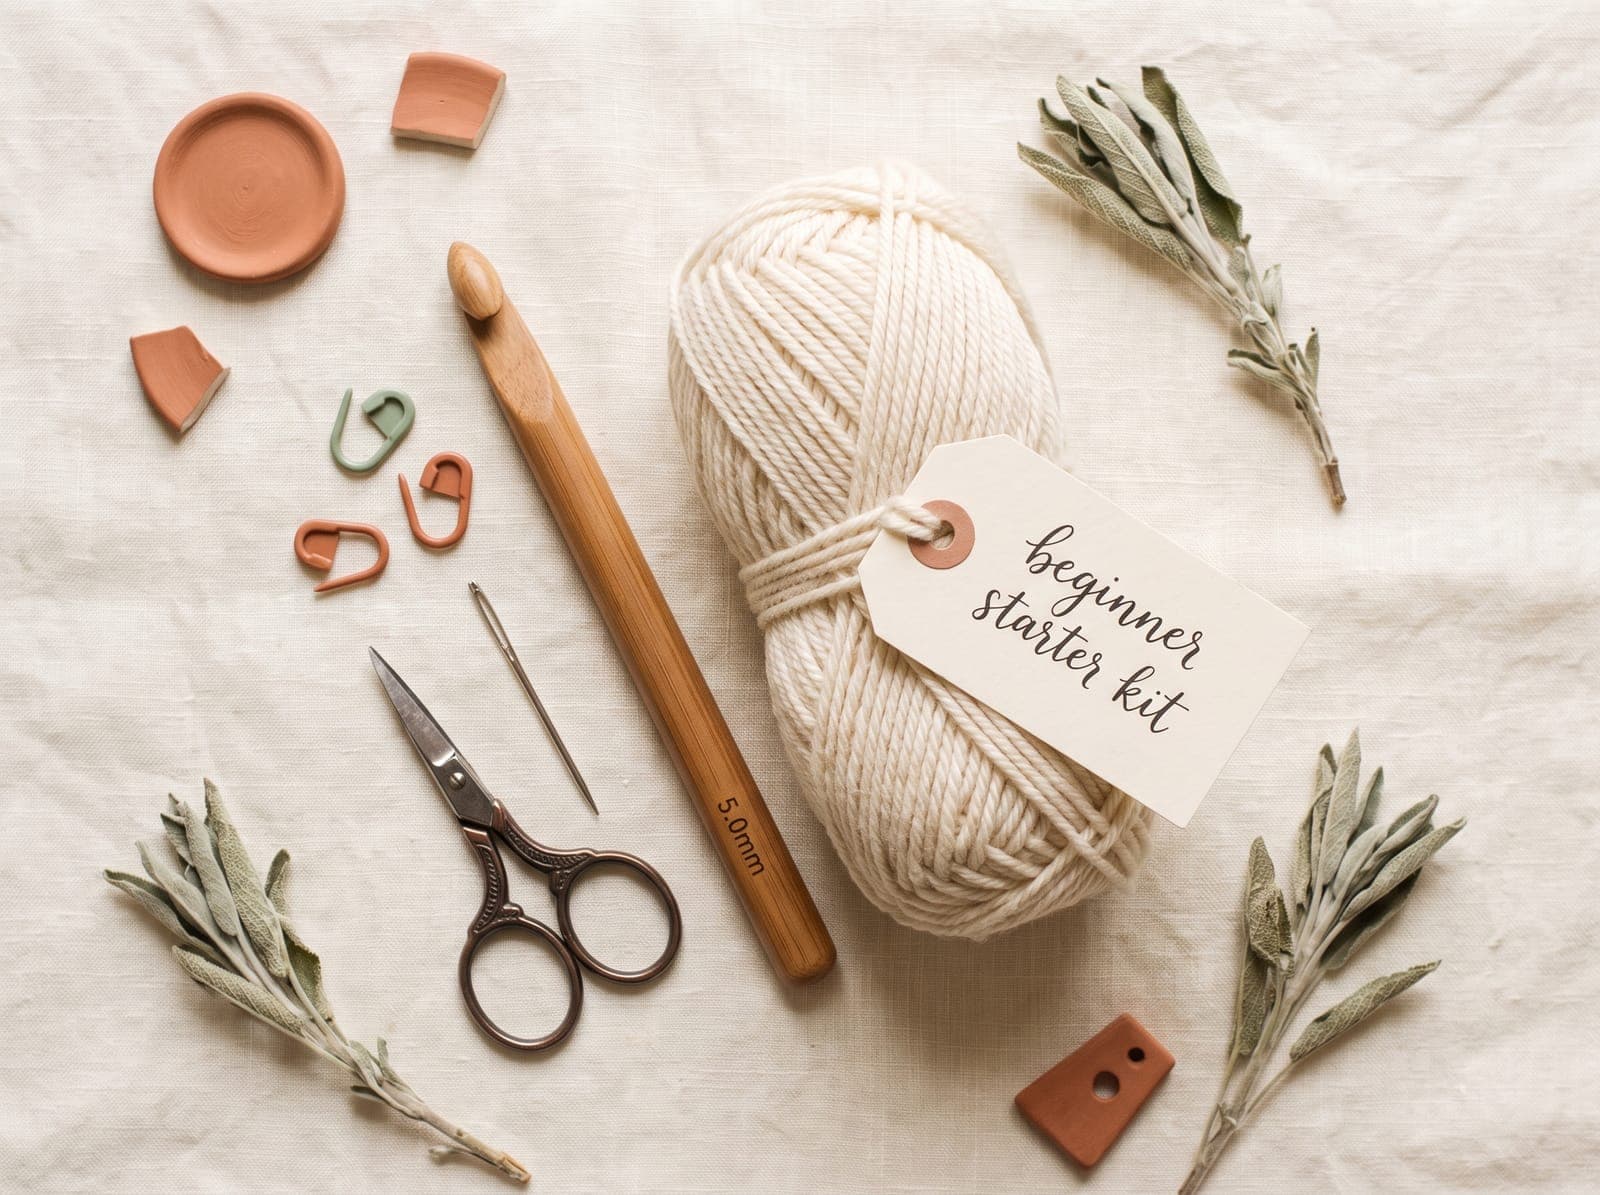
Your starter kit
- A 5.0mm (H) hook — a comfy middle size to learn on.
- Smooth, light-colored worsted yarn — pale yarn lets you actually see your stitches (dark yarn hides them, which is misery for a beginner).
- Scissors.
- A tapestry needle for weaving in ends.
- A couple of stitch markers (optional, but handy).
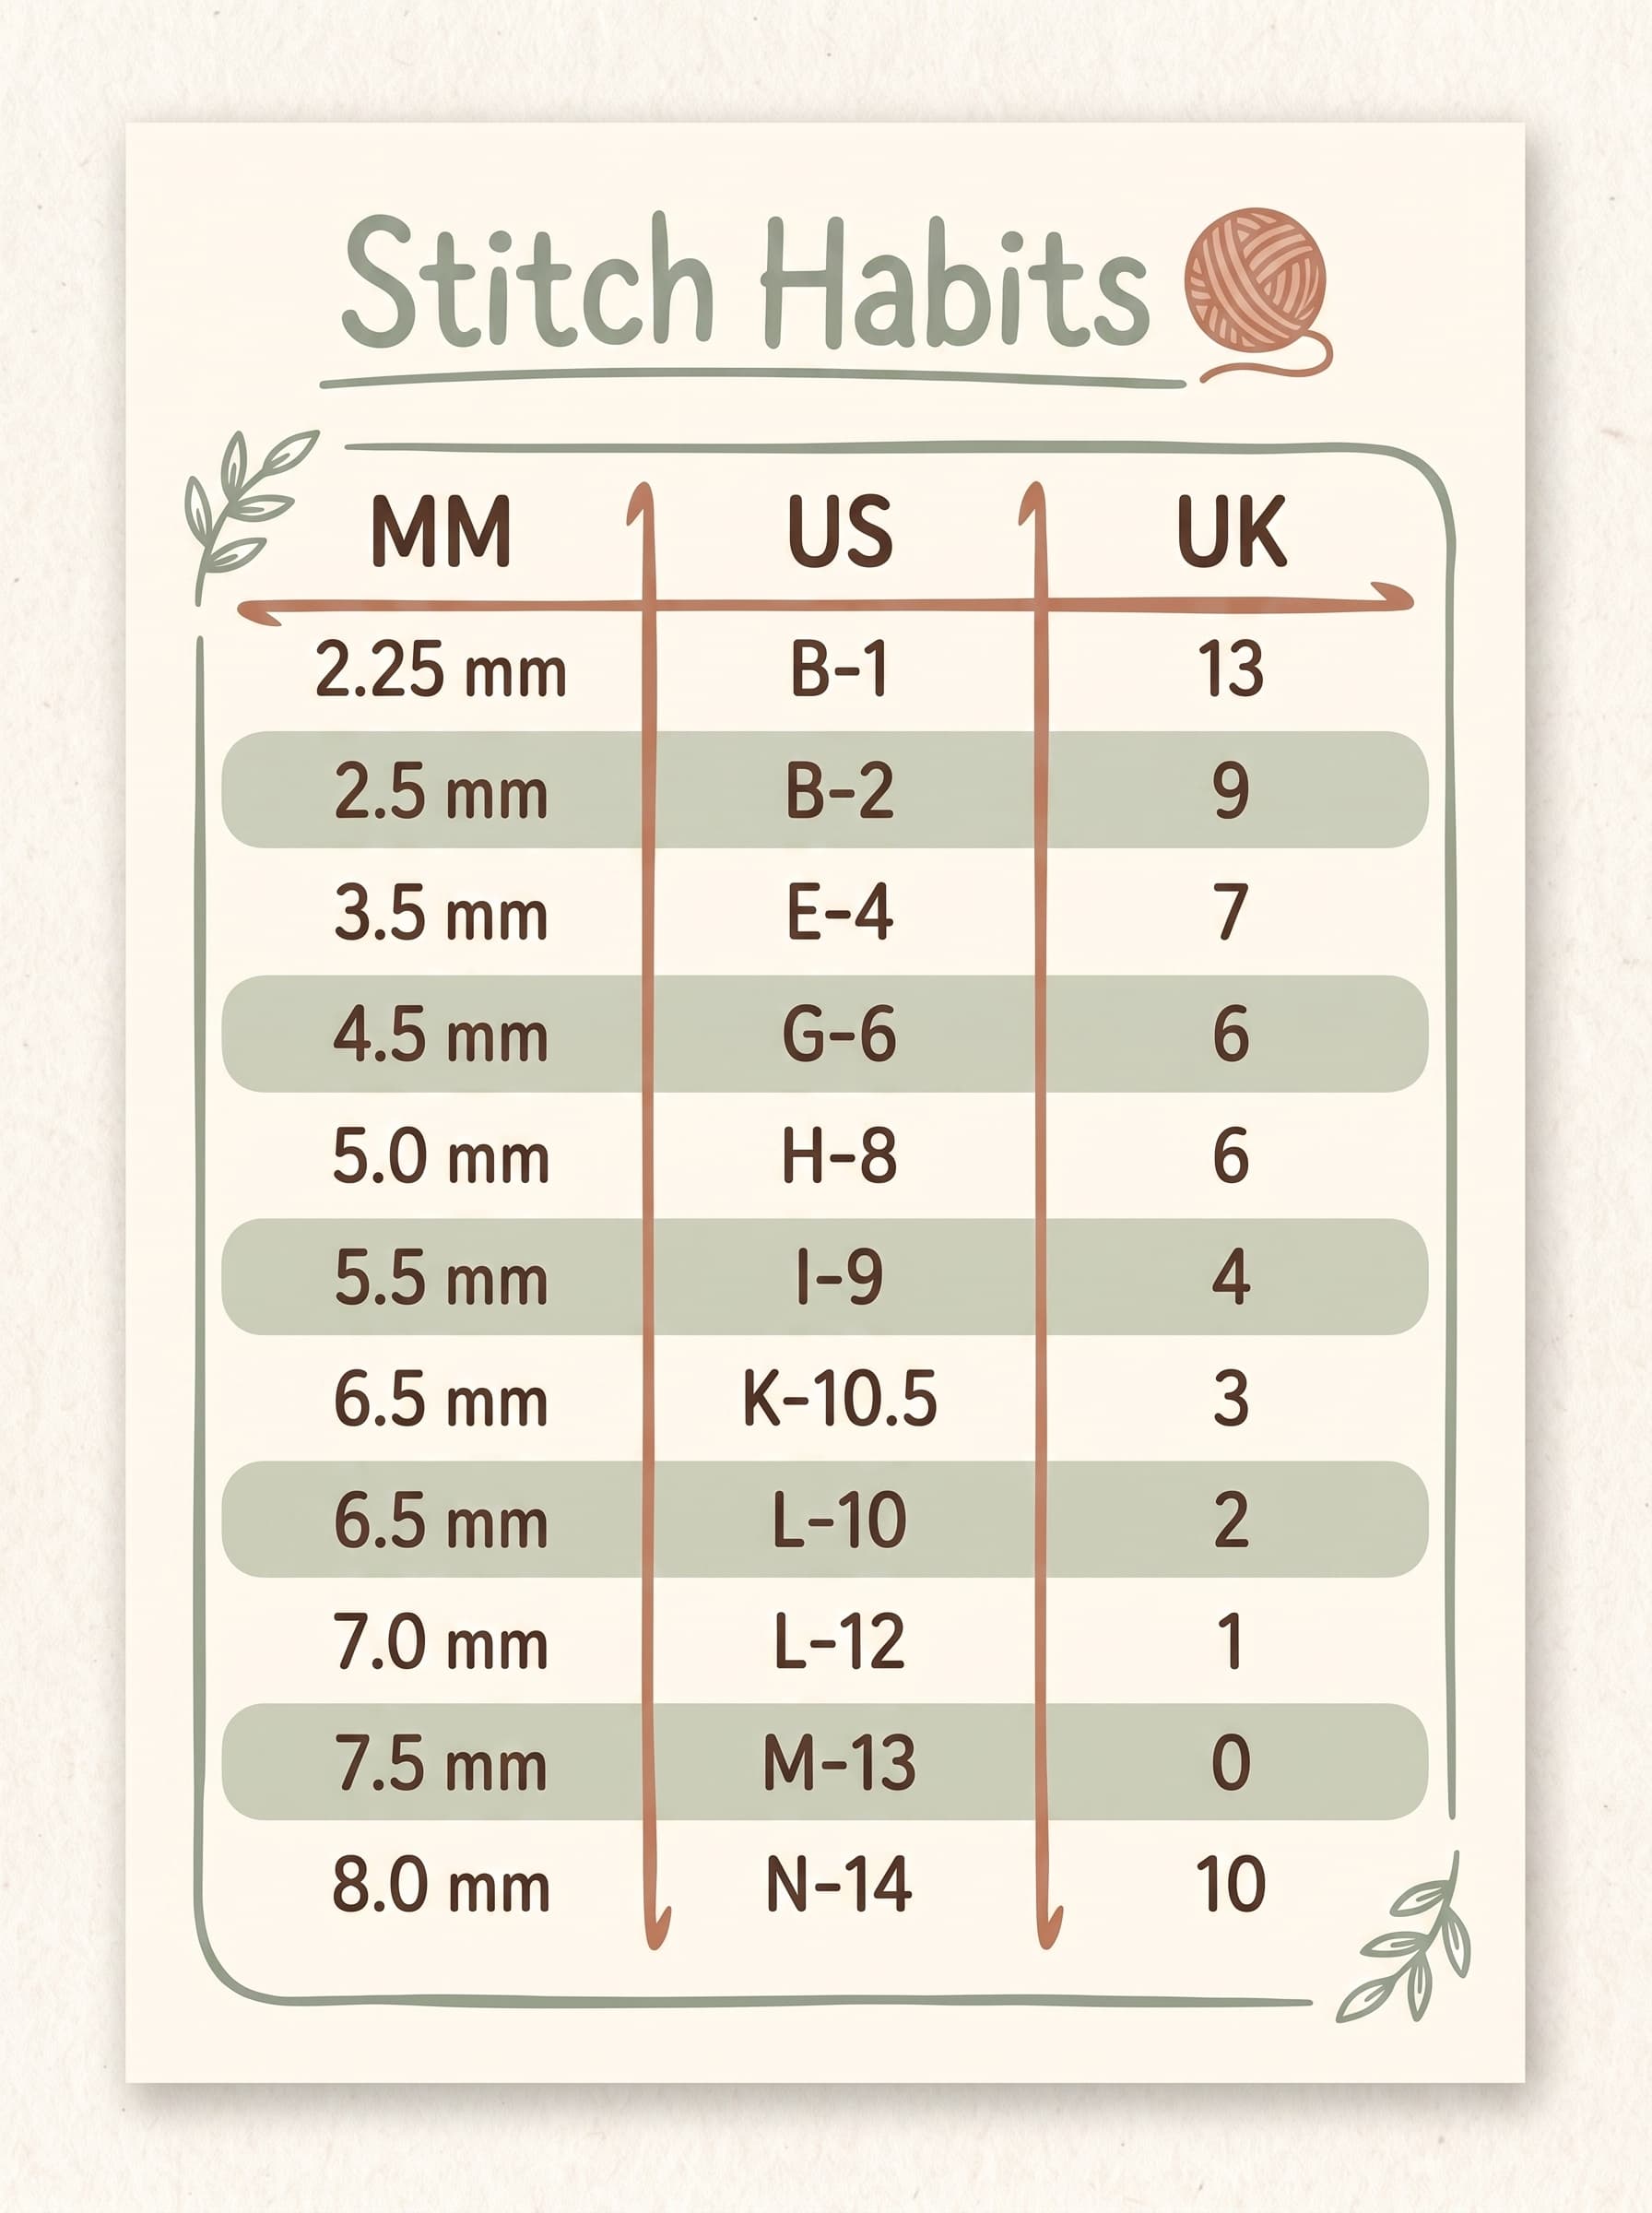
That’s genuinely it. Want the full rundown on hook sizes, yarn weights, and which notions are worth it? We break it all down in the complete crochet tools & supplies guide.
How to hold your hook and yarn
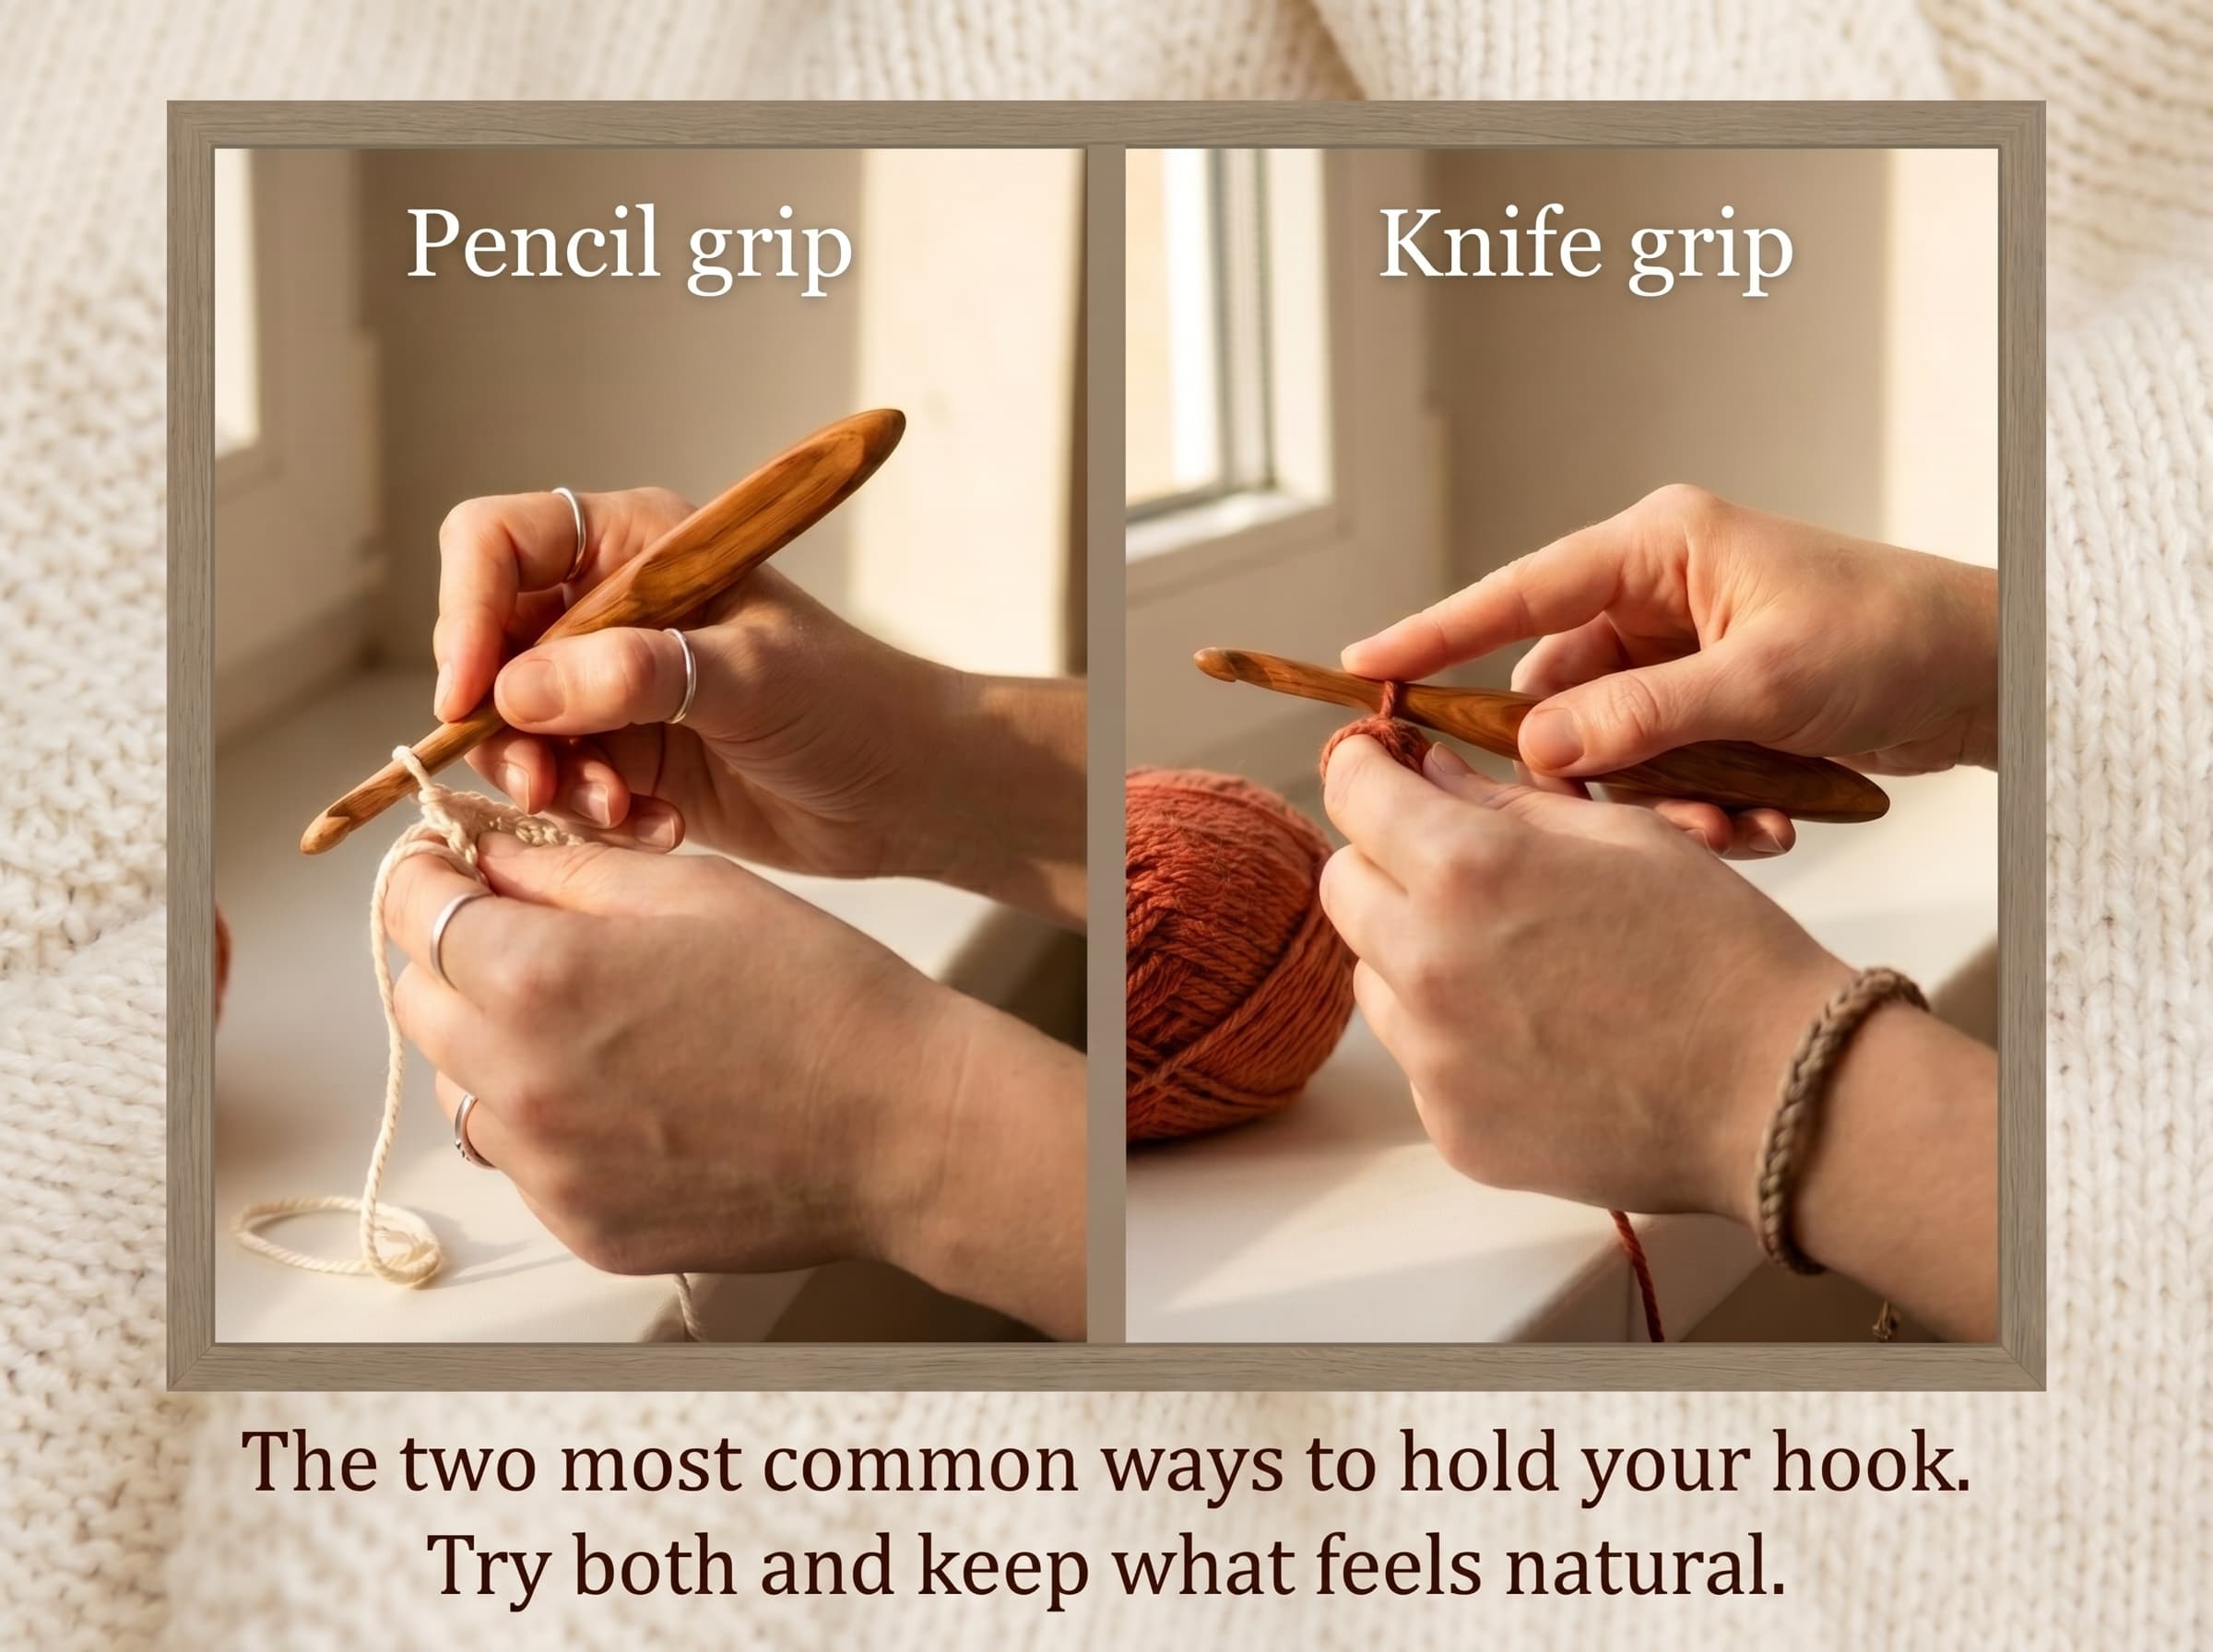
There’s no single “right” grip, just the one your hands settle into. Two common ways to hold the hook:
- Pencil grip — hold it like you’re about to write. Feels natural to most beginners.
- Knife grip — hold it like a steak knife, hand over the top. Tends to be easier on your wrist over long sessions.
Try both for a few minutes and keep whichever feels less fiddly. For the yarn, loop the working strand loosely over your fingers so it feeds out with a little tension, not slack and not strangled. This part feels clumsy on day one and automatic by day three, so don’t overthink it.
With your kit ready and the hook in hand, let’s make your very first loops: the chain.
The foundation: chain & slip stitch
These two are the quiet workhorses of crochet. The chain starts almost every project. The slip stitch joins, moves, and finishes them. Neither is flashy, but you’ll use both in nearly everything you make, so this is time well spent.
The slip knot (your very first loop)
Before the chain, you need a slip knot on your hook. It’s the adjustable loop everything else hangs from. Make a loop with your yarn, pull the working strand through it, slide it onto your hook, and gently snug it up. Not too tight, you still want it to slide.
The chain stitch (ch)
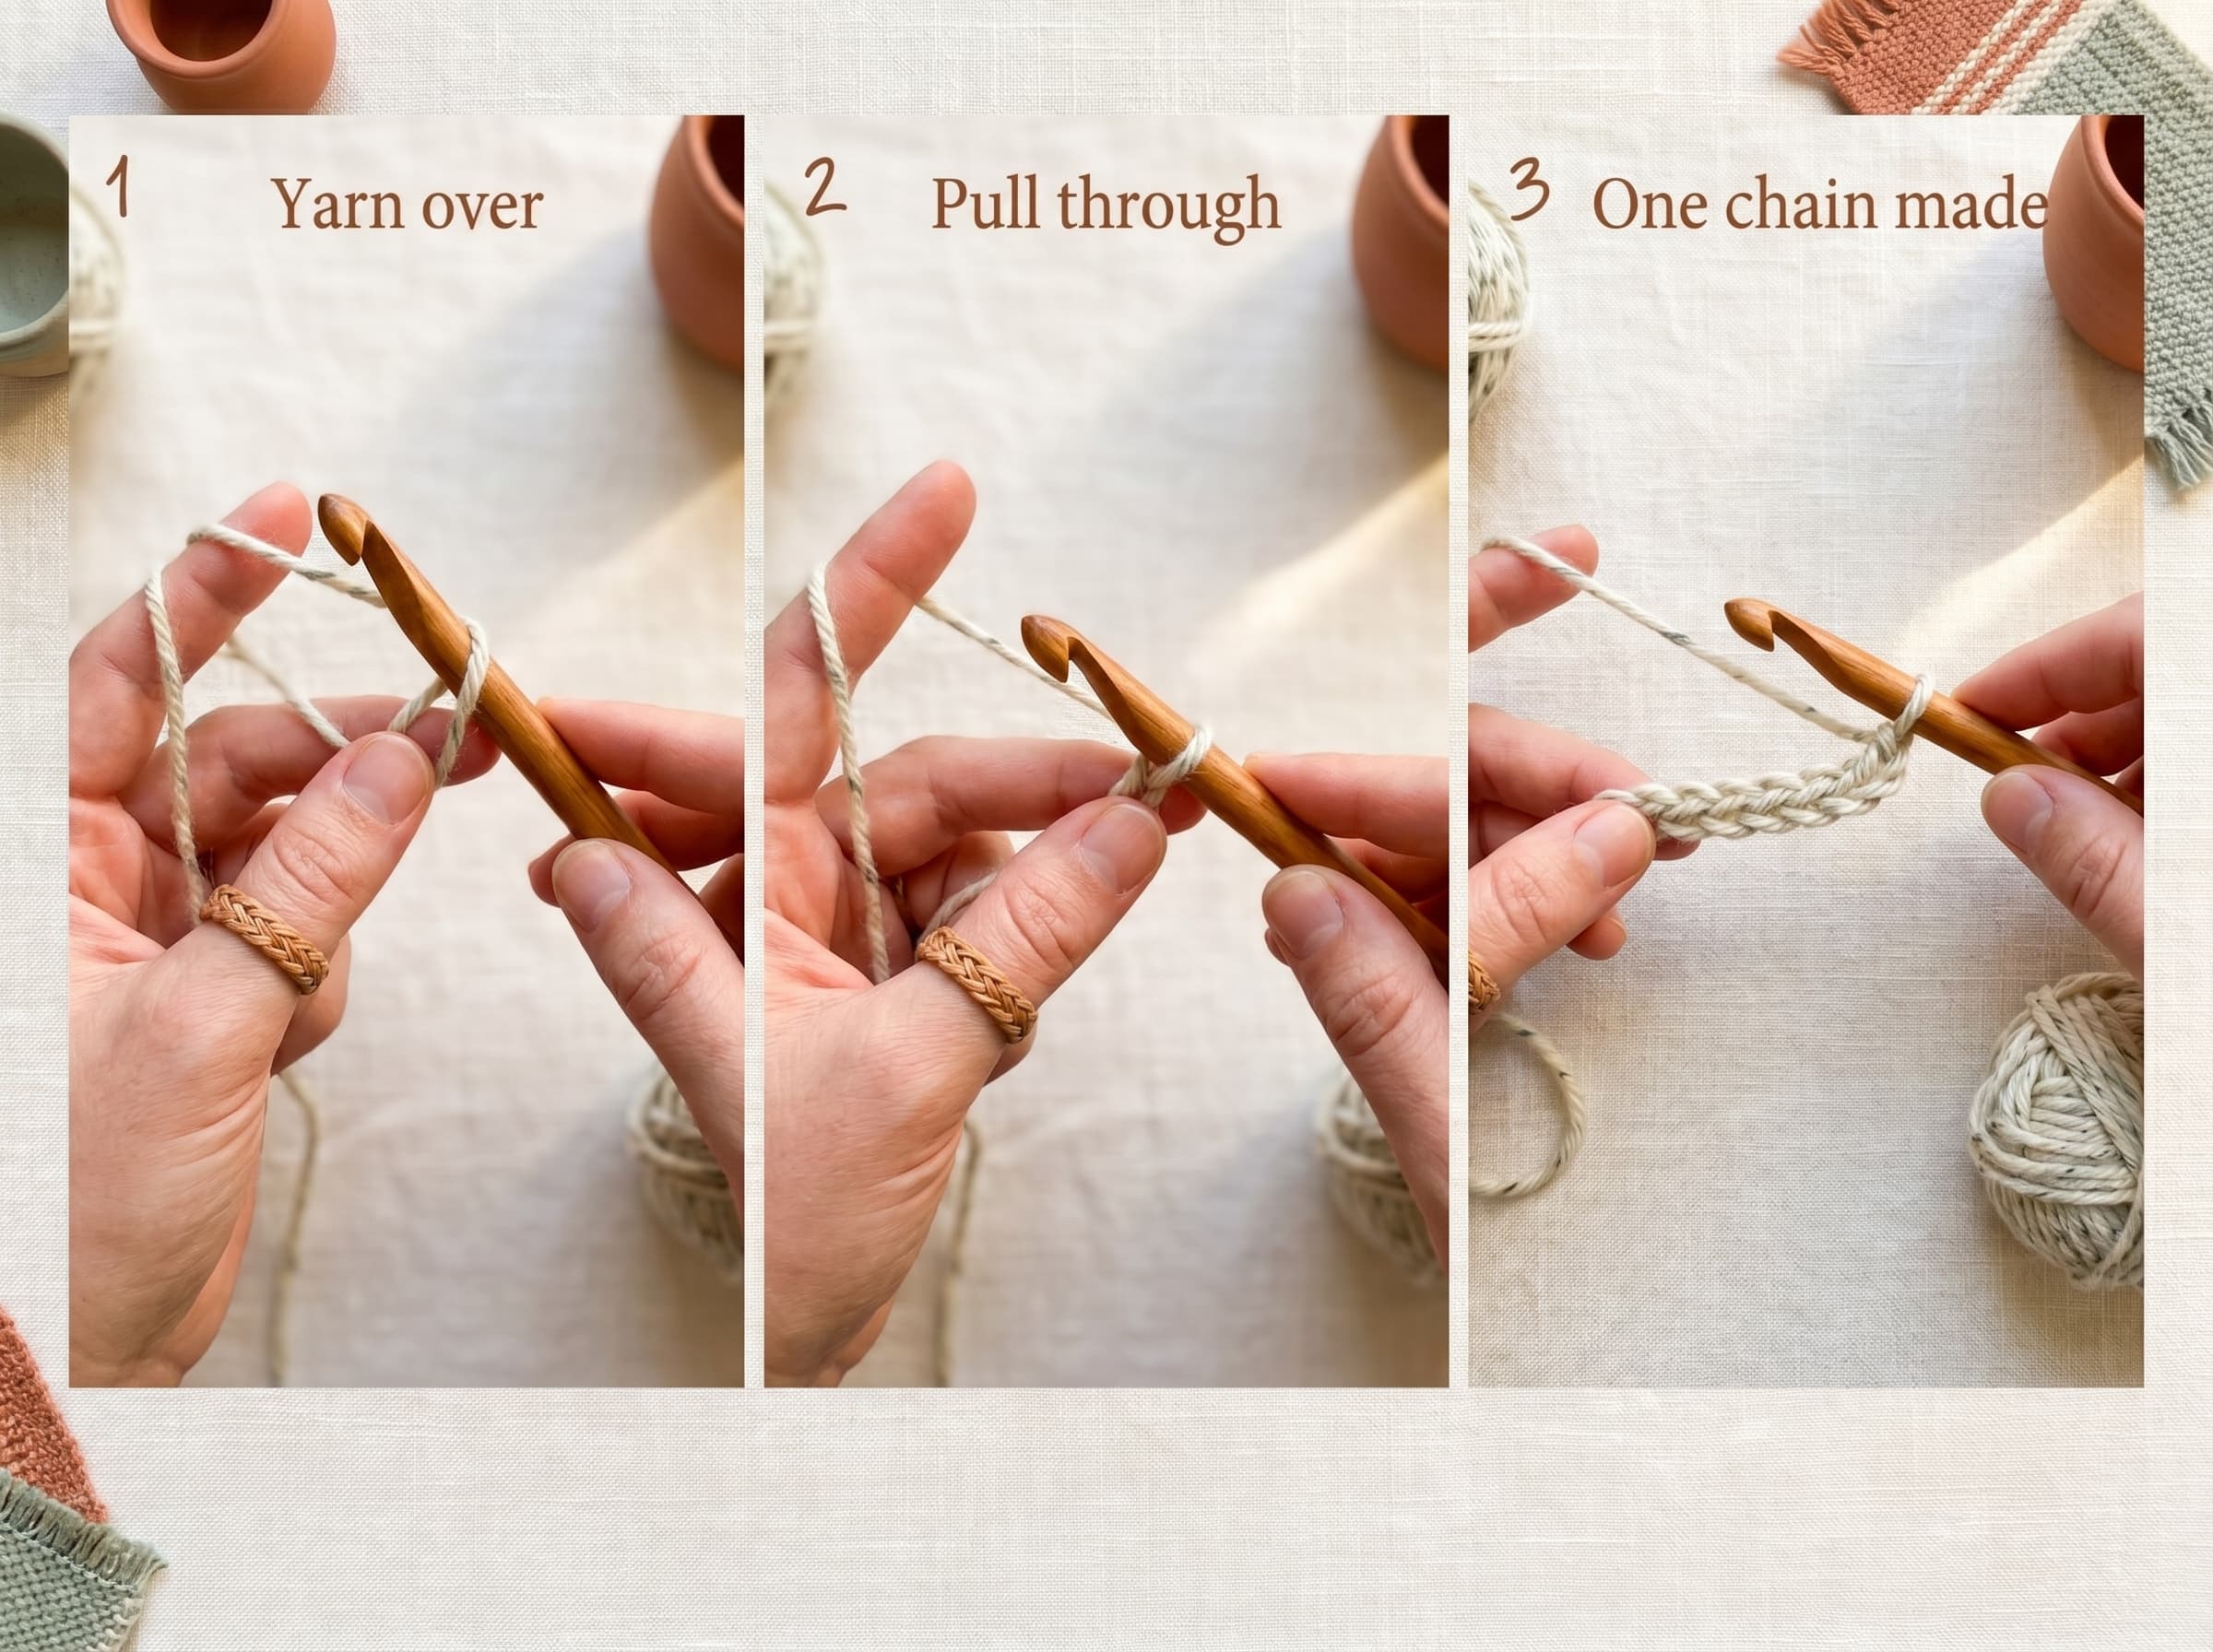
The chain is a row of connected loops, and it’s the base most projects are built on. With your slip knot on the hook: yarn over (wrap the yarn around your hook), then pull that wrap through the loop already on your hook. That’s one chain. Do it again, and again, and you’ve got a chain.
Keep them loose and even. Beginners almost always crochet too tight, which makes that first row a nightmare to work into. Aim for relaxed and roomy.
The slip stitch (sl st)
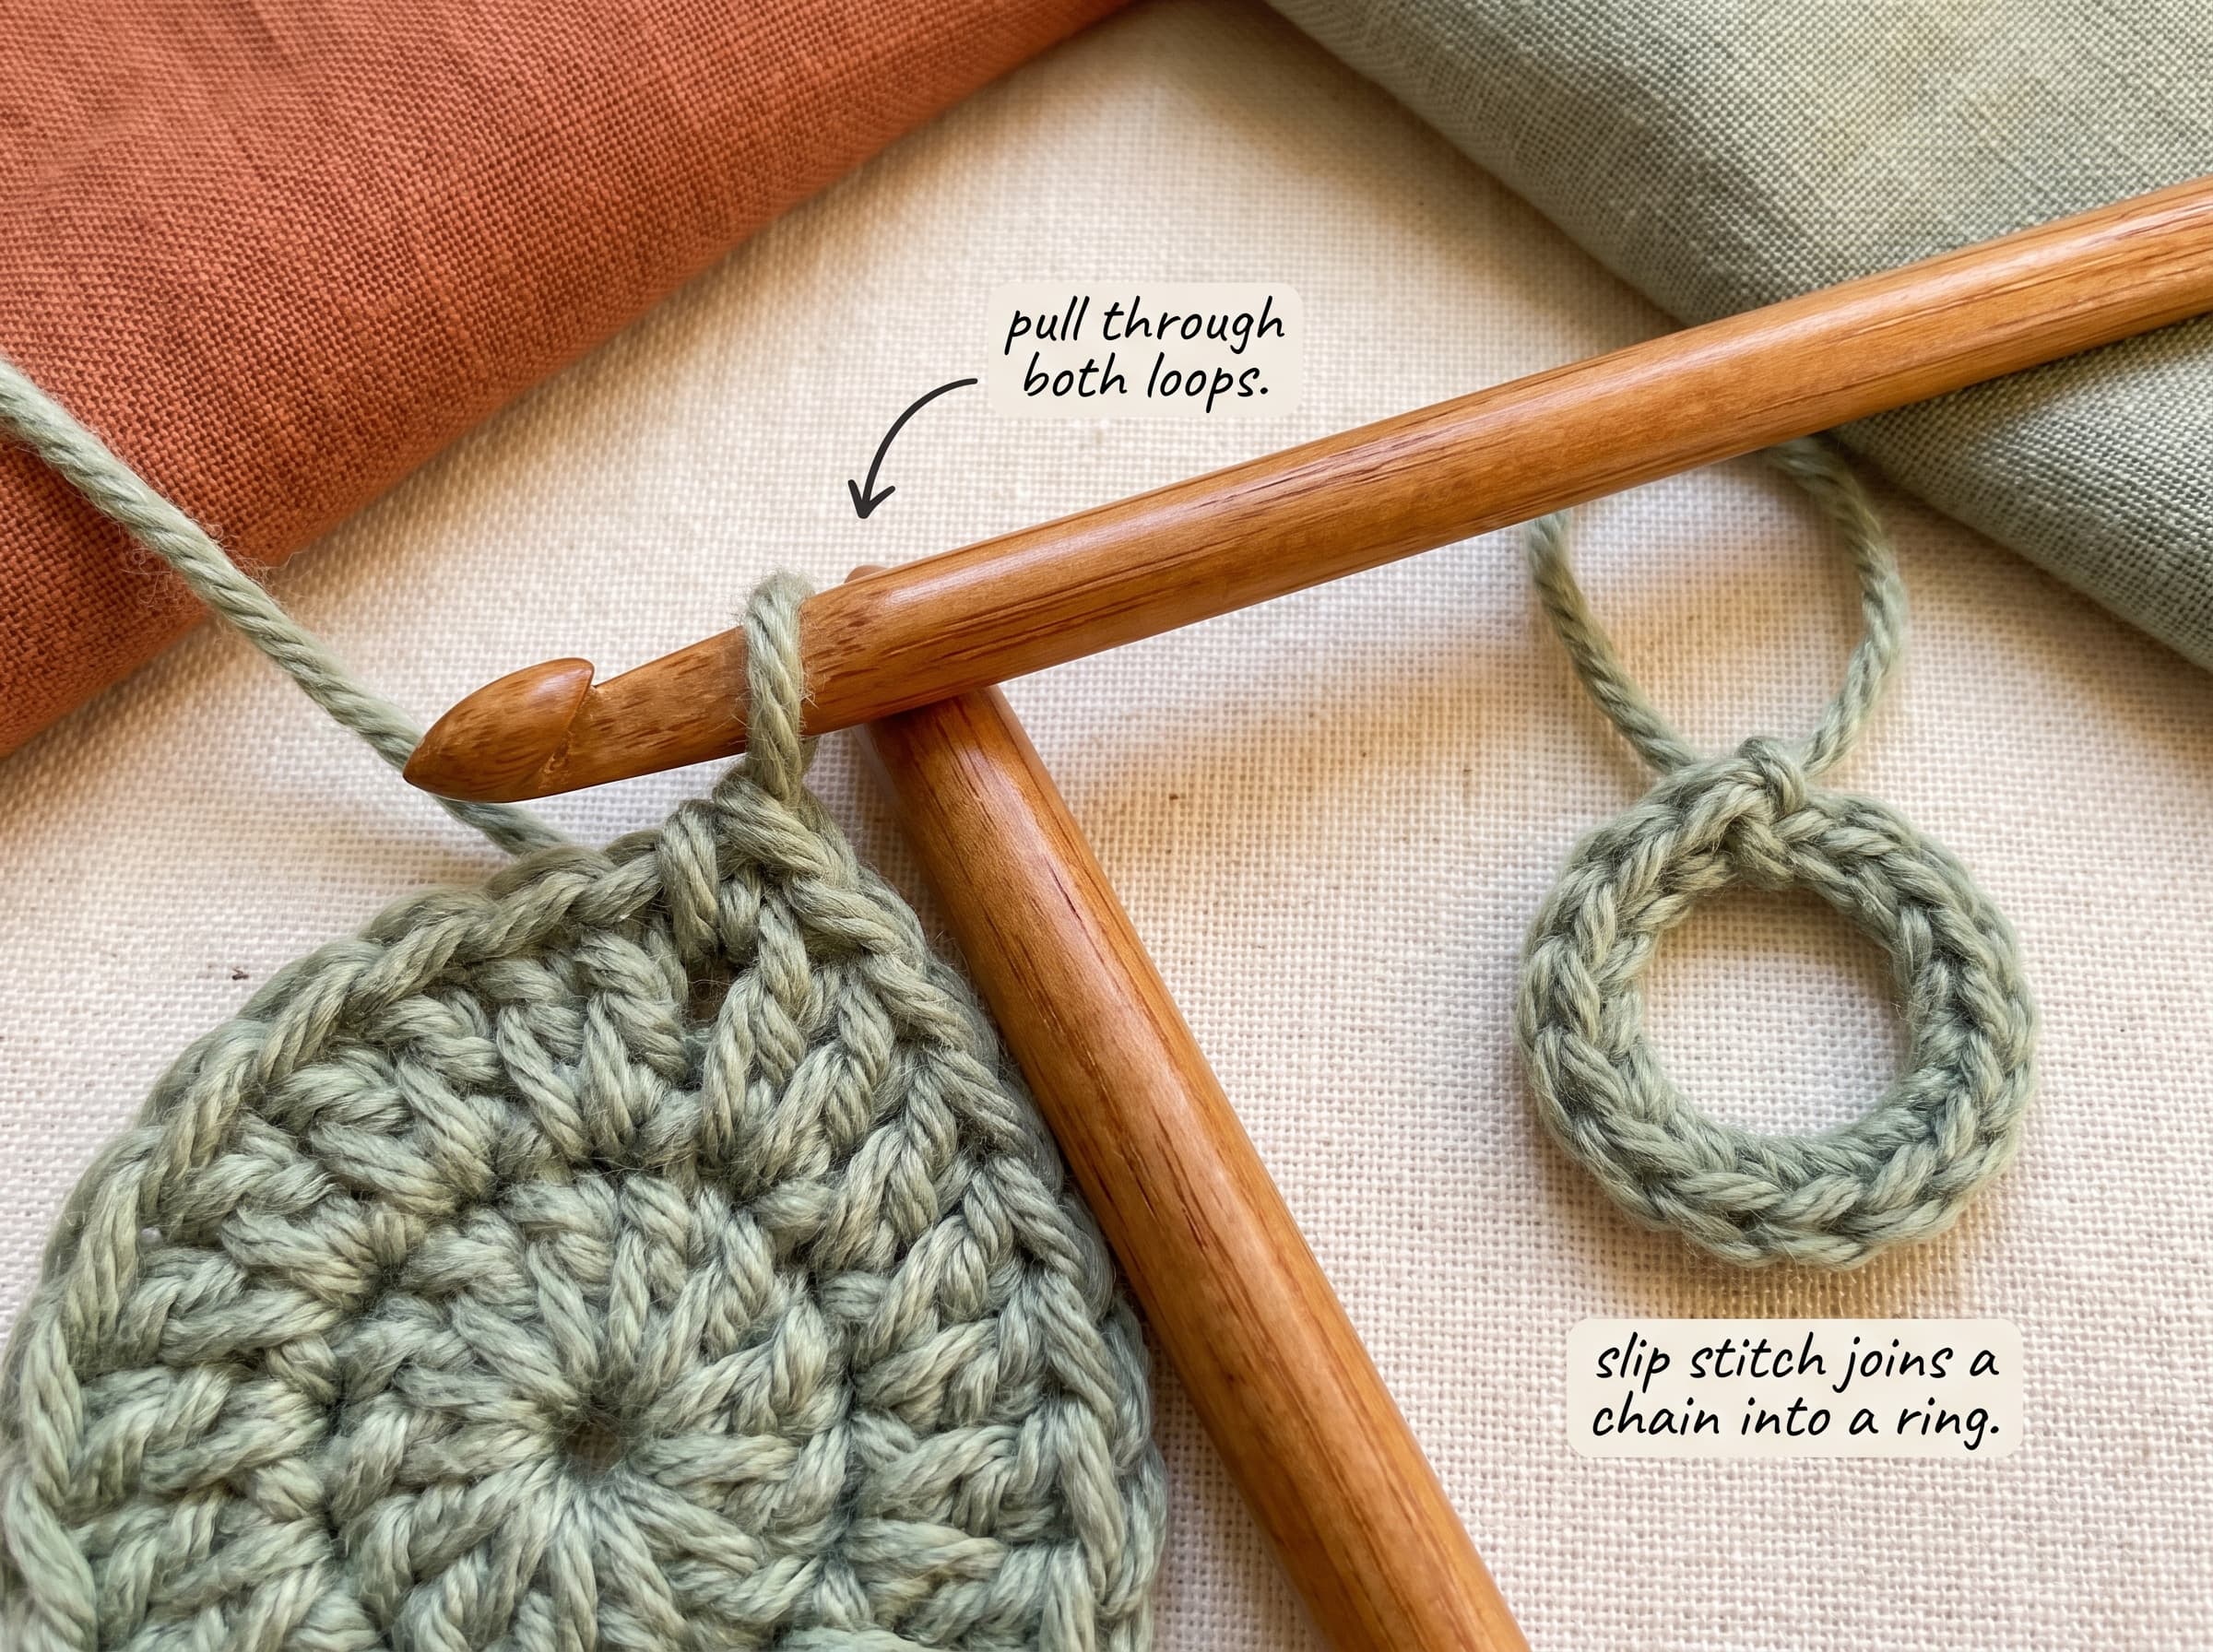
The slip stitch is the flattest stitch there is. It barely adds height, which makes it perfect for joining (turning a chain into a ring for hats and granny squares), moving your yarn across stitches without a bump, and finishing edges neatly.
To make one: insert your hook into the next stitch, yarn over, and pull that loop straight through both the stitch and the loop on your hook in one motion. That’s it. No extra steps, no added height.
Master these two and the next part clicks into place, because every “real” stitch is just a chain with extra steps stacked on top. Up next: the basic stitches.
Basic stitches (the four that build everything)
Here’s the big secret: these four stitches are basically the same move, just taller each time. You add one extra “yarn over” at the start and pull through one extra time, and the stitch grows. Learn single crochet and the rest are small upgrades, not new skills.
They go, shortest to tallest: single → half double → double → treble.
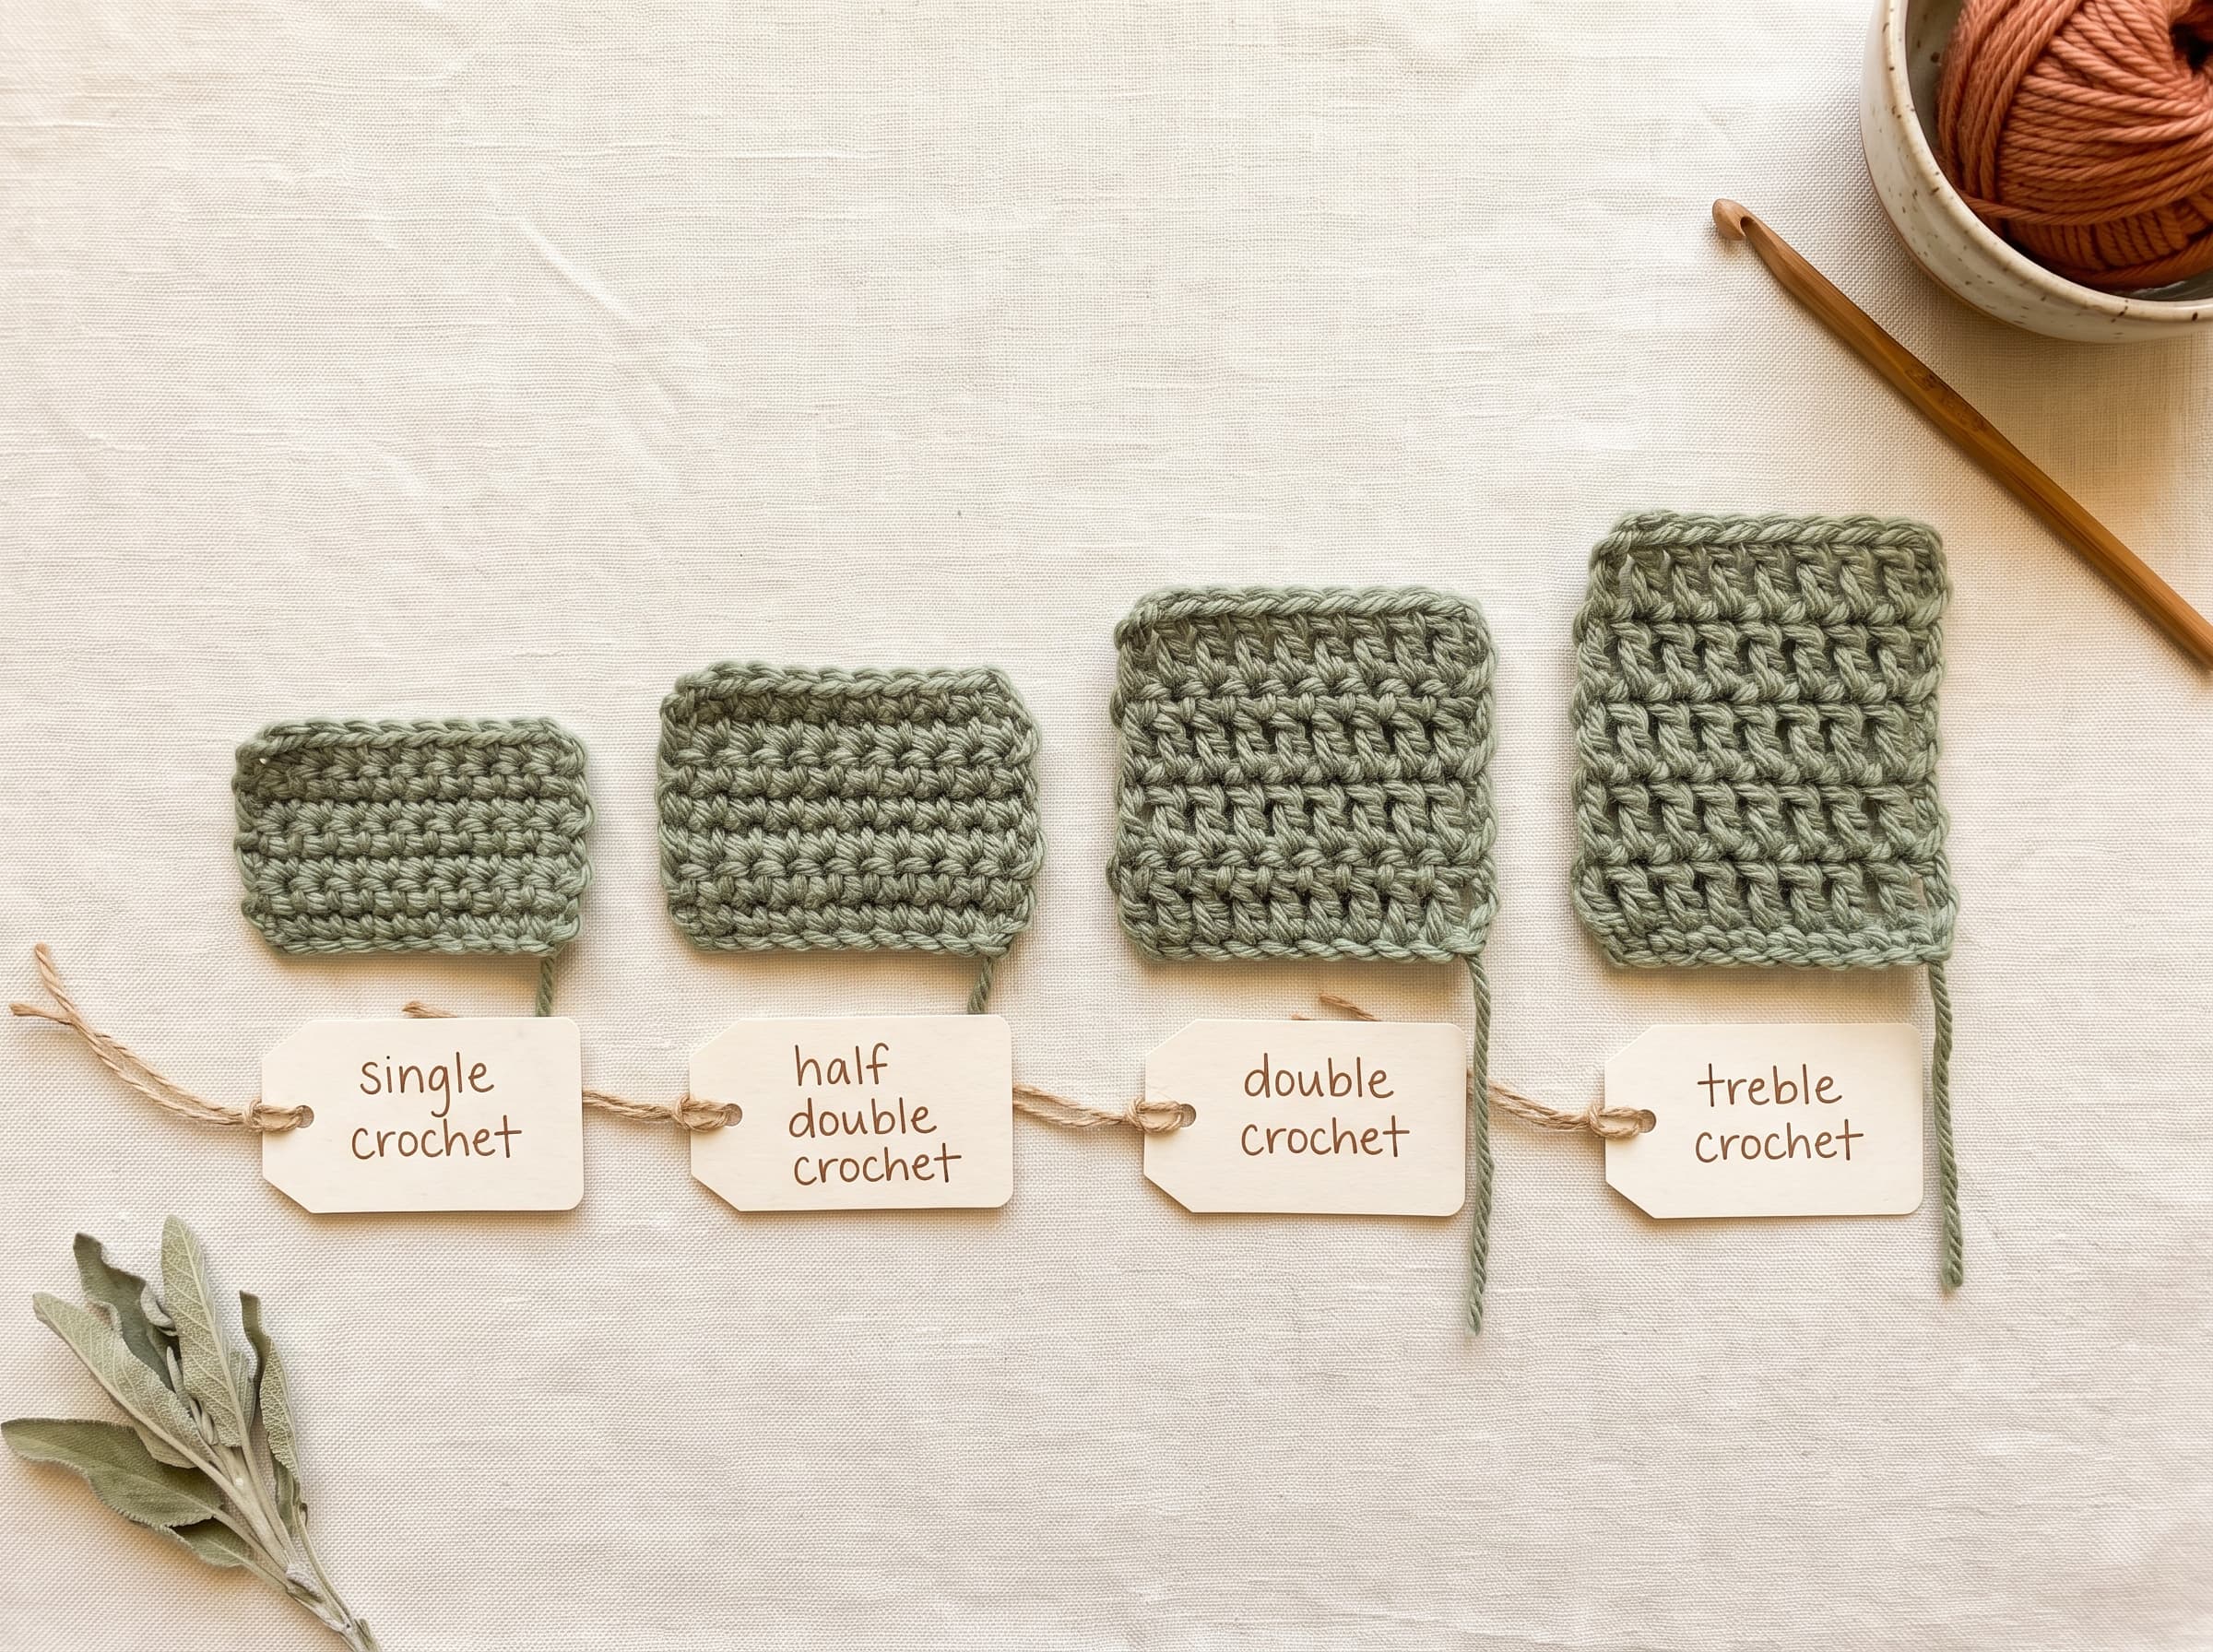
Single crochet (sc)
The shortest, tightest, sturdiest stitch, and the one most patterns start you on. It makes a dense, firm fabric that’s great for amigurumi, bags, and anything that needs to hold its shape.
Quick version: insert hook, yarn over, pull up a loop (2 loops on hook), yarn over, pull through both. Done.
Full step-by-step: How to Single CrochetHalf double crochet (hdc)
The in-betweener. Taller than single, shorter than double, with a slightly squishy texture that a lot of people love for blankets, beanies, and cozy wearables. It works up faster than single crochet without getting lacy.
Quick version: yarn over first, then insert hook, yarn over, pull up a loop (3 loops on hook), yarn over, pull through all 3.
Full step-by-step: Half Double CrochetDouble crochet (dc)
The workhorse of crochet. Tall, quick, and slightly open, it’s probably the stitch you’ll use most across blankets, garments, and granny squares. If you only truly master one “tall” stitch, make it this one.
Quick version: yarn over, insert hook, yarn over, pull up a loop (3 loops), yarn over, pull through 2, yarn over, pull through the last 2.
Full step-by-step: Double CrochetTreble crochet (tr)
The tall, airy one. An extra yarn over at the start makes it stretch up high and work up fast, giving an open, drapey fabric that’s lovely for lacy shawls and light summer pieces.
Quick version: yarn over twice, insert hook, yarn over, pull up a loop (4 loops), then yarn over and pull through 2 loops, three times.
Full step-by-step: Treble CrochetYou now know every stitch most patterns will ever ask for. Everything from here is those same stitches combined into texture, which is exactly where the fun starts.
Textured stitches (where it gets fun)
This is the part people fall in love with. Textured stitches aren’t new techniques, they’re the basic four arranged in clever ways to make bumps, ridges, and squish. If you can do a double crochet, you can do every stitch below. Here are four favorites to start with.
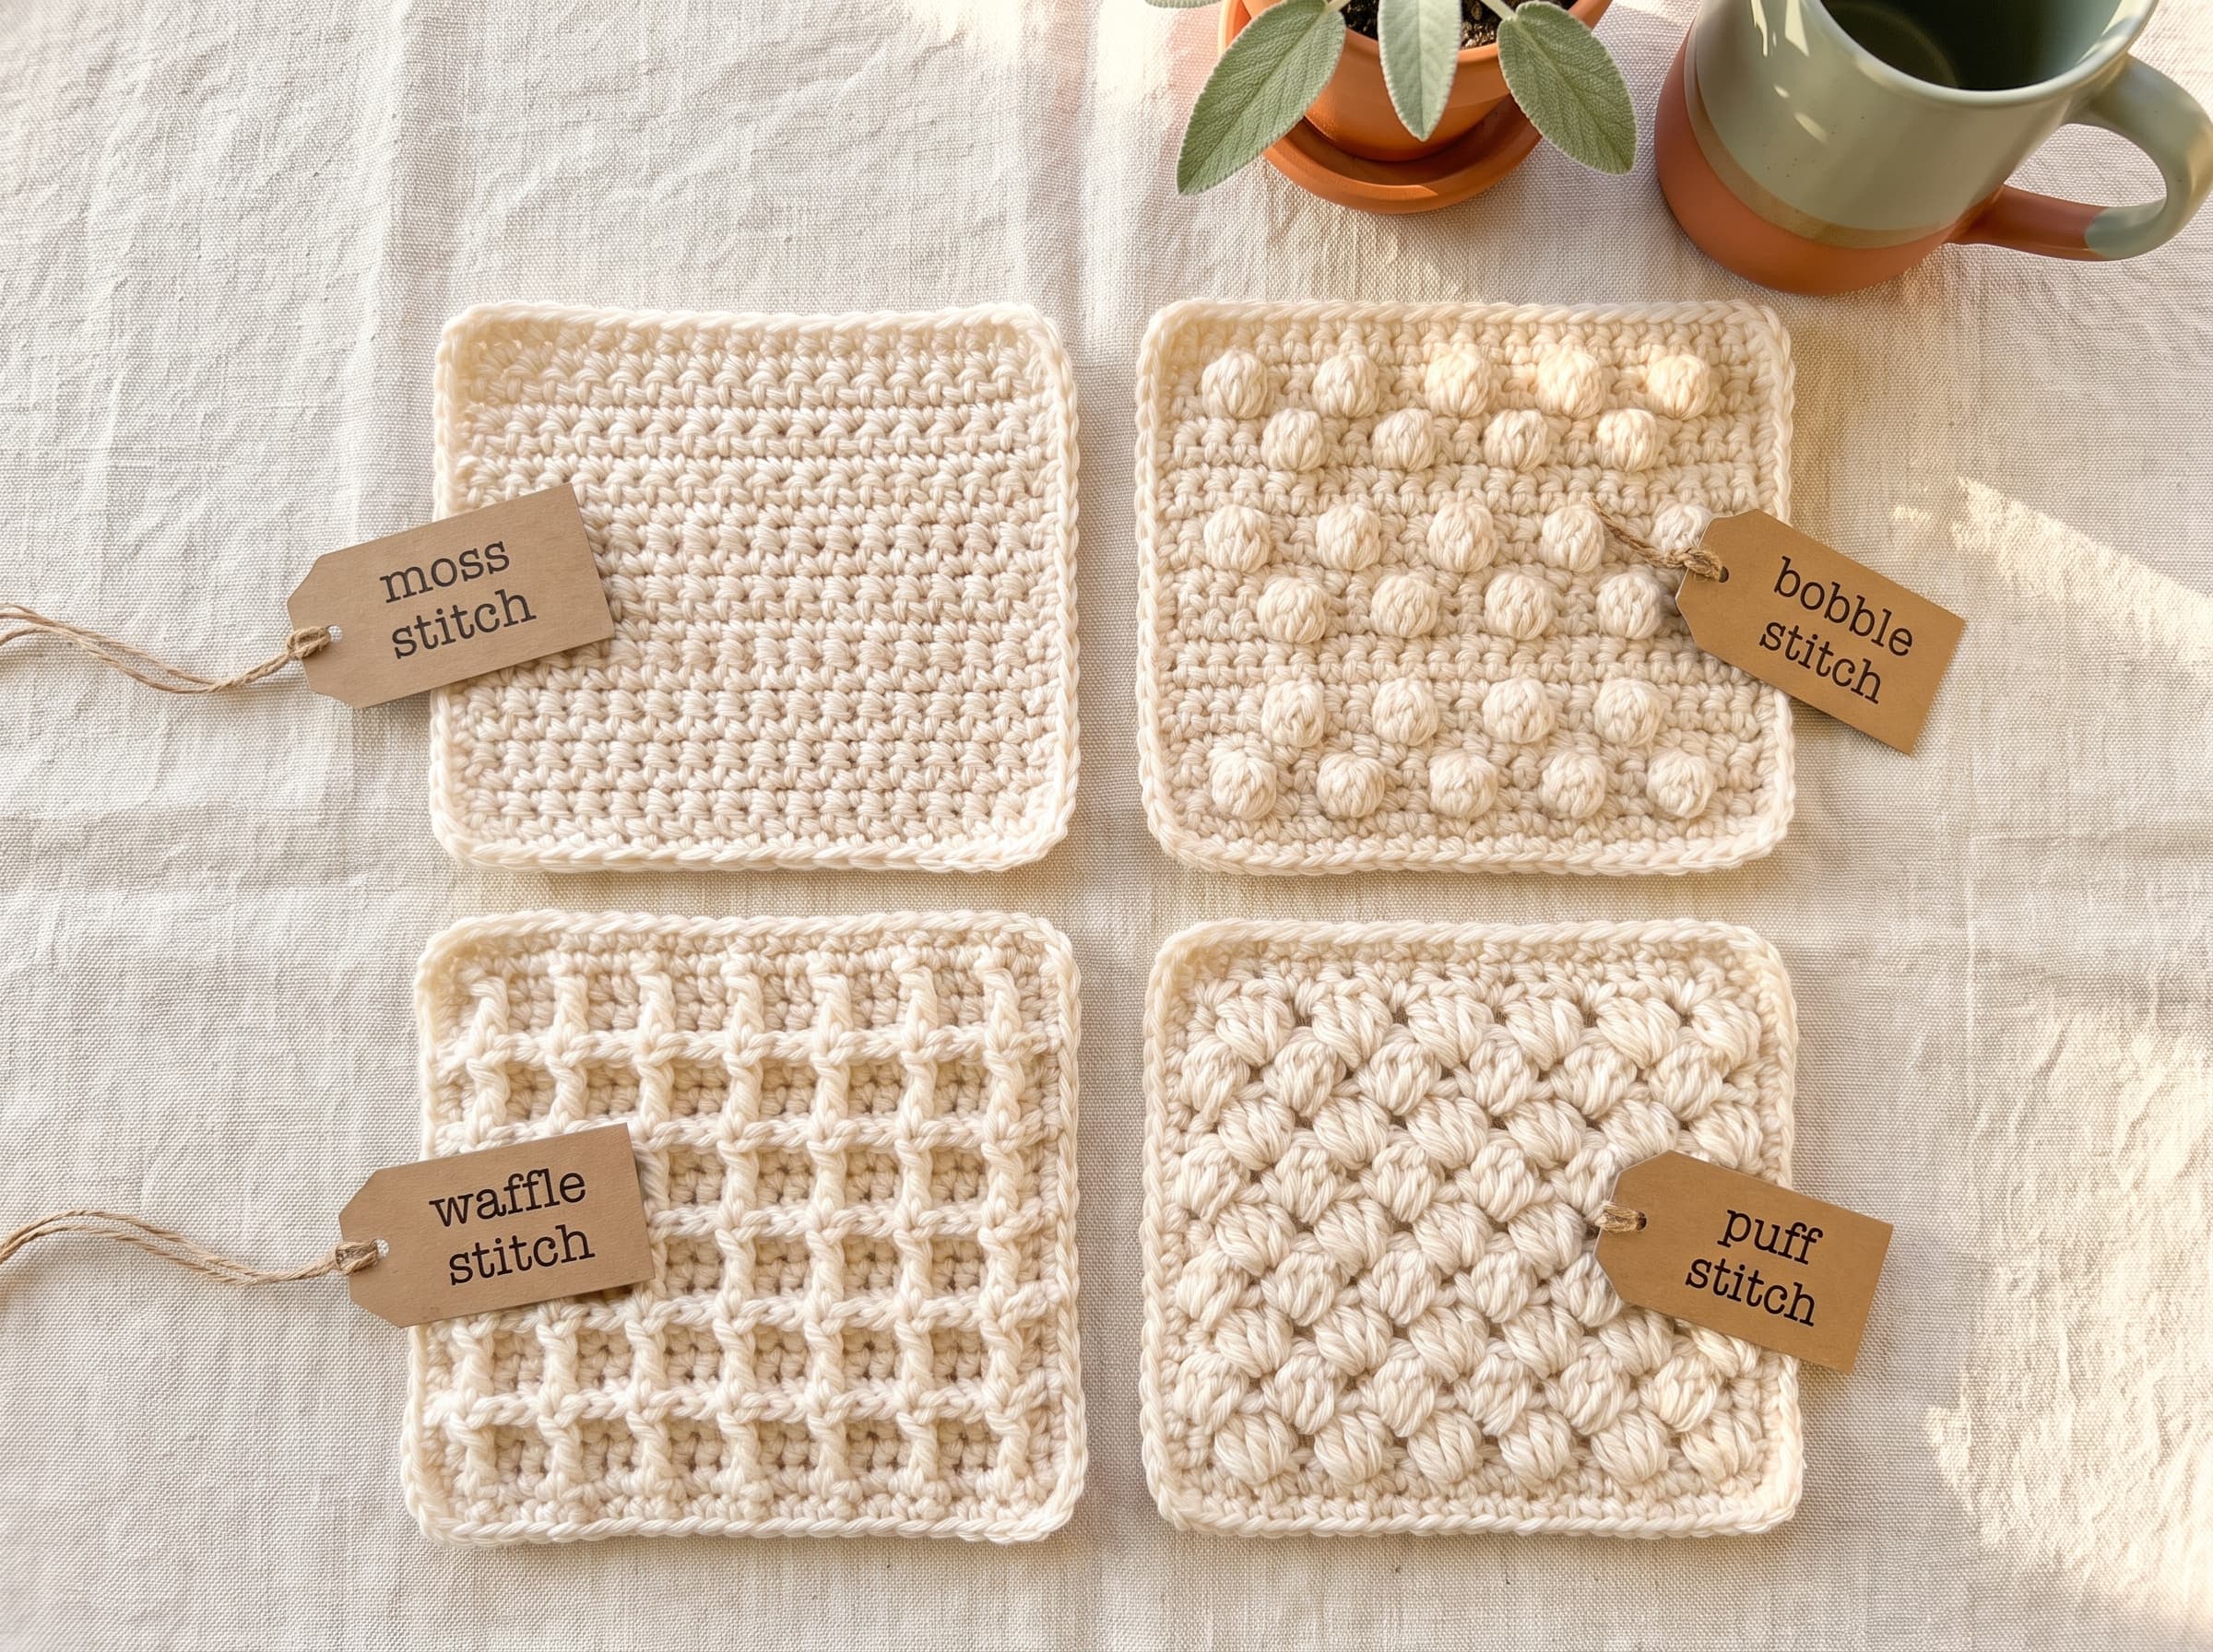
Moss stitch (a.k.a. linen or granite stitch)
Don’t let the three names scare you, this is one of the easiest textured stitches there is. It’s just single crochet and chain, alternating, and it makes a flat, woven-looking fabric that lies beautifully flat and never curls. Perfect for dishcloths, scarves, and beginner blankets.
Full tutorial: Moss Stitch Crochet(soon)Bobble stitch
These are the fat, round bumps you’ve seen on cozy baby blankets. You make a bobble by working several unfinished double crochets into one stitch, then closing them all together so they pop forward. A little fiddly the first time, very satisfying by the third.
Full tutorial: Bobble Stitch Crochet(soon)Waffle stitch
Exactly what it sounds like: a deep, squishy grid that looks like a fresh waffle. It’s built from raised “post” stitches that stand up off the fabric, giving lovely thick texture for blankets, washcloths, and anything you want warm and cushy. Uses more yarn, but the result is worth it.
Puff stitch
Soft, pillowy little clusters made by pulling up several loose loops and gathering them into one puff. Gentler and rounder than a bobble, it’s gorgeous for baby items and anything you want to feel tactile and squeezable.
These four are just the start, there are dozens more, but master these and you’ve got texture in your toolkit. Next come the decorative stitches that turn texture into actual designs.
Decorative & special stitches (the pretty ones)
If textured stitches add feel, decorative stitches add design. These are the fans, scallops, lacy edges, and classic motifs you spot on shawls, baby blankets, and grandma’s afghan. Same basic stitches underneath, just grouped to make shapes. Here are the four worth knowing first.
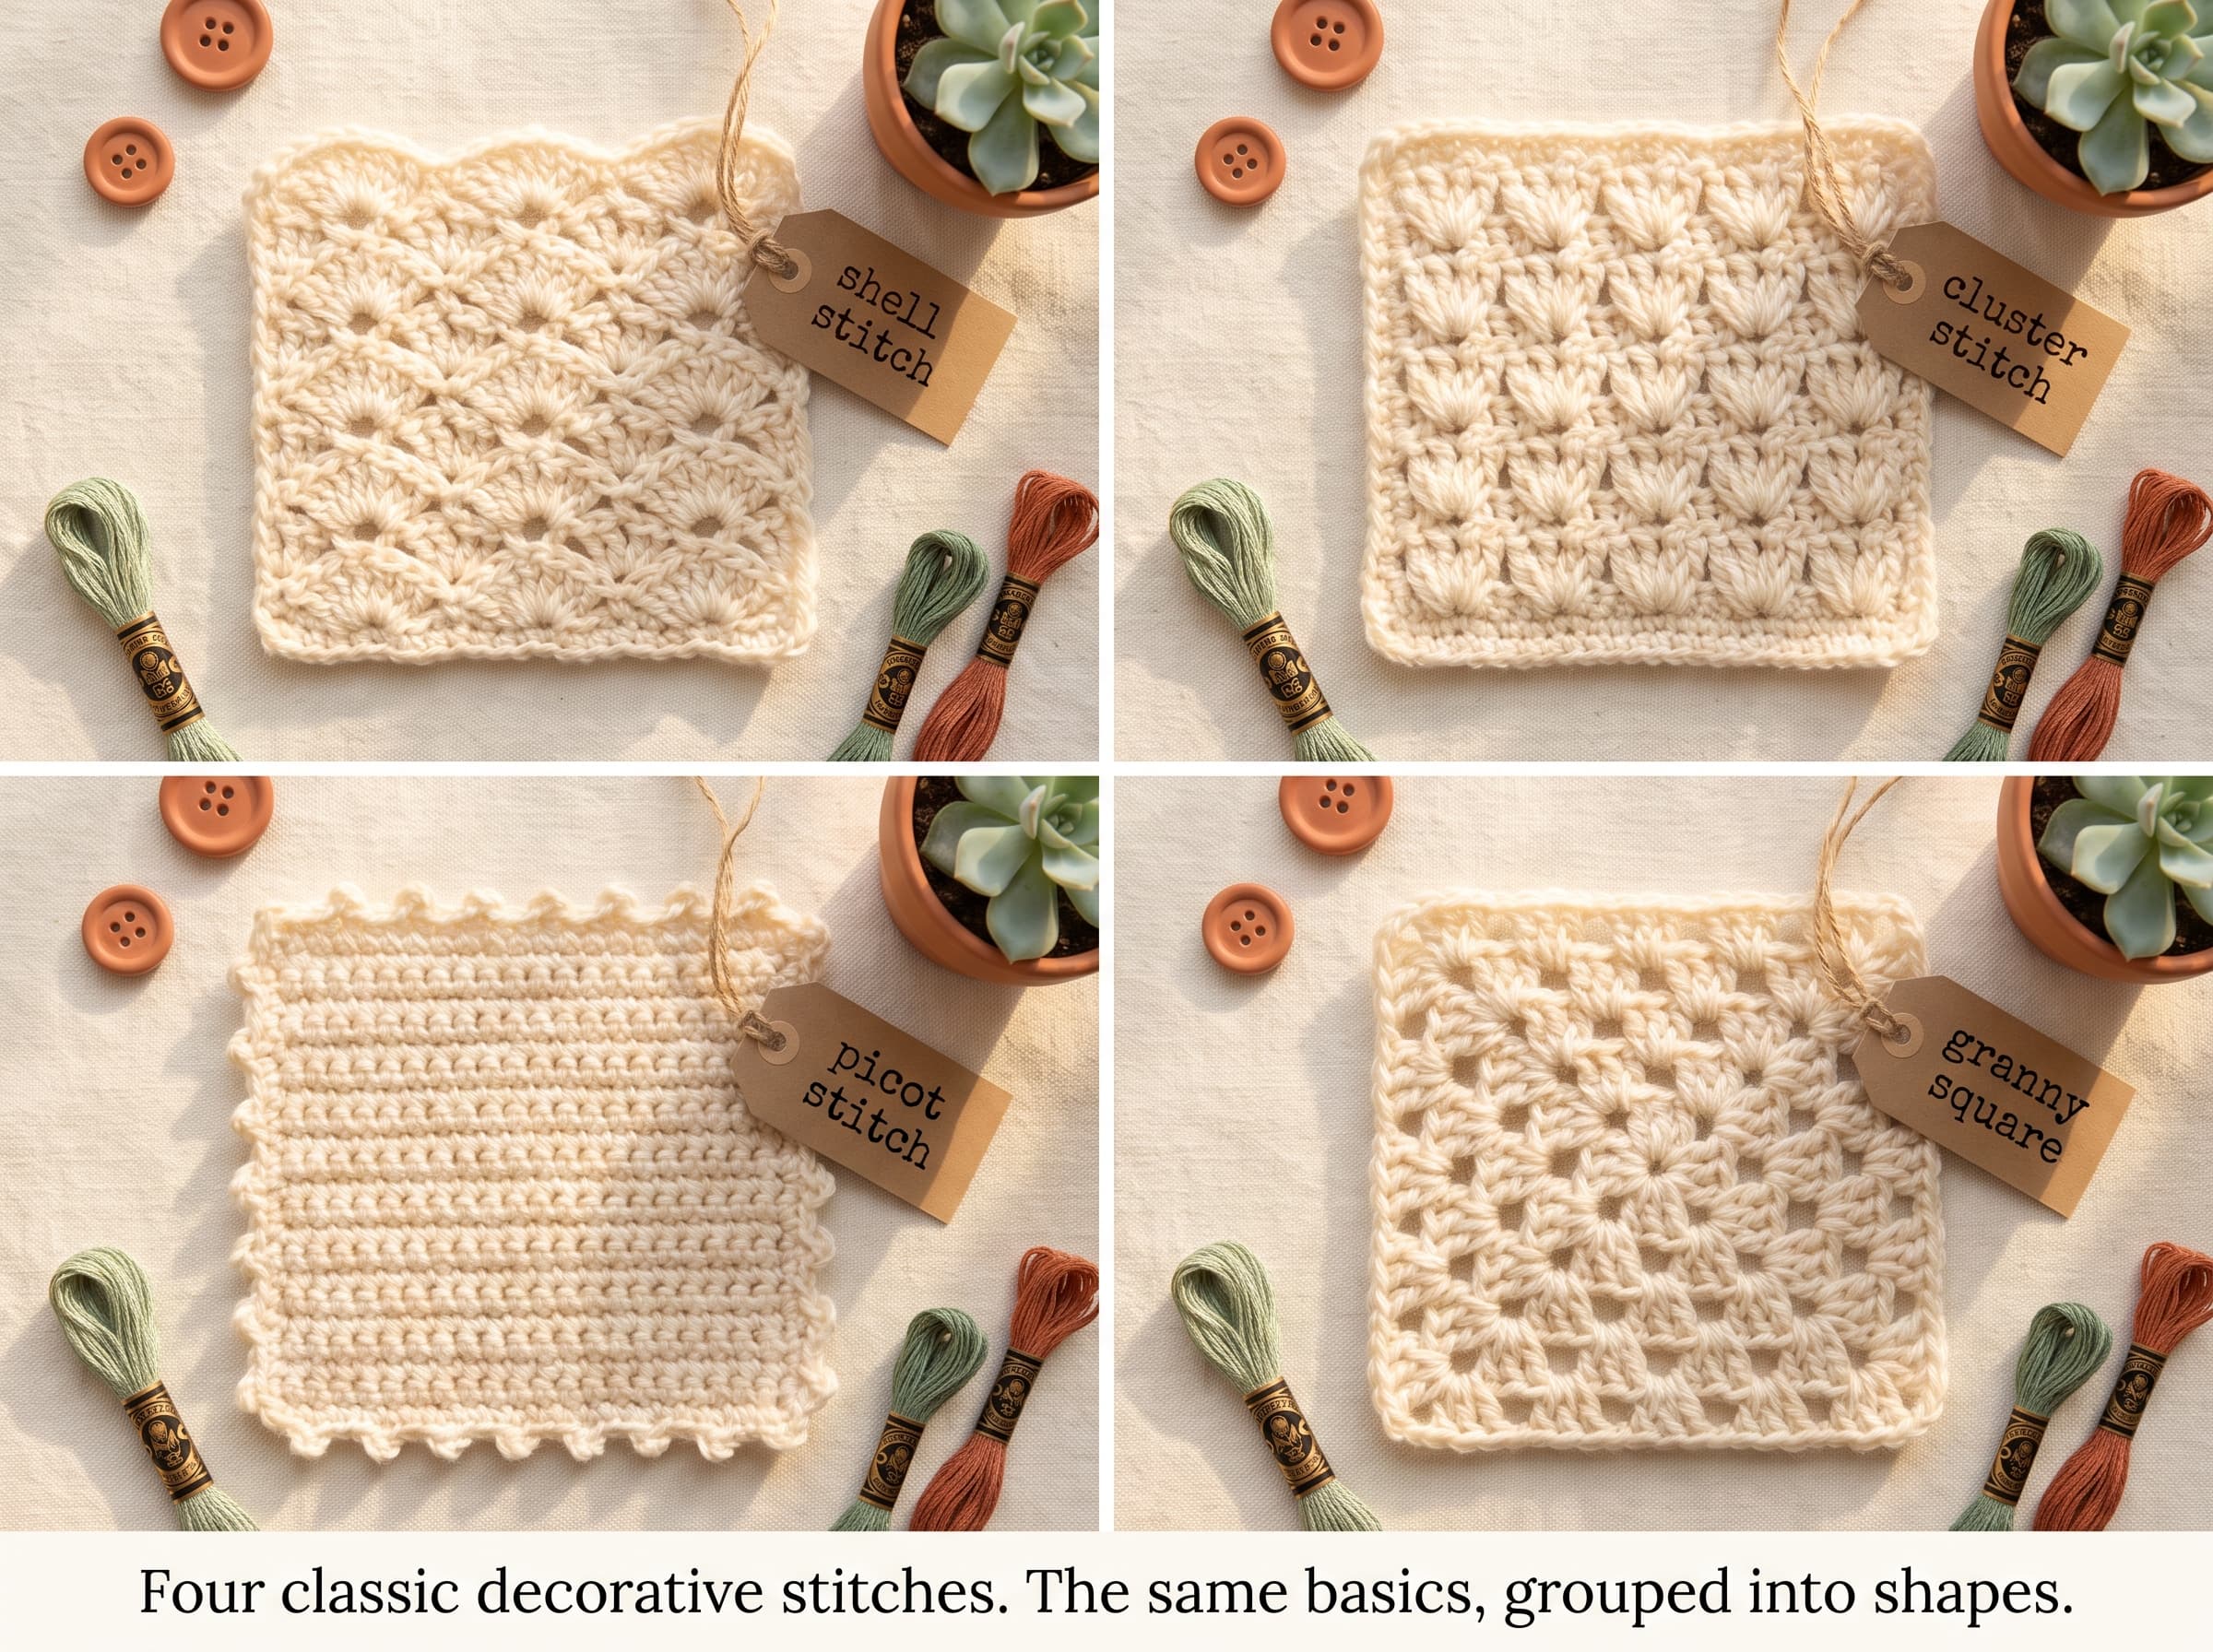
Shell stitch
The pretty fan. You work several stitches (usually double crochets) into the same spot so they spread out like a scallop shell. Repeat it across a row and you get a soft, wavy edge that’s everywhere in shawls, baby blankets, and border trims. Easy to do, looks fancy, which is the best kind of stitch.
Cluster stitch
The opposite move from a shell. Instead of fanning stitches out, you gather several together at the top into one neat point, creating little V-shaped bundles with airy gaps between them. Great for lacy, lightweight fabric with lots of drape.
Picot stitch
A tiny decorative bump, usually added along an edge to finish it with a delicate, beaded look. It’s basically a small chain looped back on itself. A picot won’t build a whole project, but it’s the little flourish that makes an edge look intentional and polished.
Granny square
The icon. A granny square is built in rounds from small clusters of double crochet, growing outward from the center, and it’s the foundation of countless blankets, cardigans, and bags. It’s also brilliant for beginners because it’s small, portable, and endlessly repeatable. Make a pile and join them into anything.
That’s the full landscape of everyday stitches. The last group is the bigger techniques, the ones that unlock whole new styles of crochet.
Advanced techniques (the next level)
“Advanced” sounds scary, but really these are just three ways of crocheting that open up whole new looks, like color pictures and knit-style fabric. You don’t need them to make beautiful things, and you can happily skip this section as a beginner. But when you’re ready to level up, here’s where you go next.
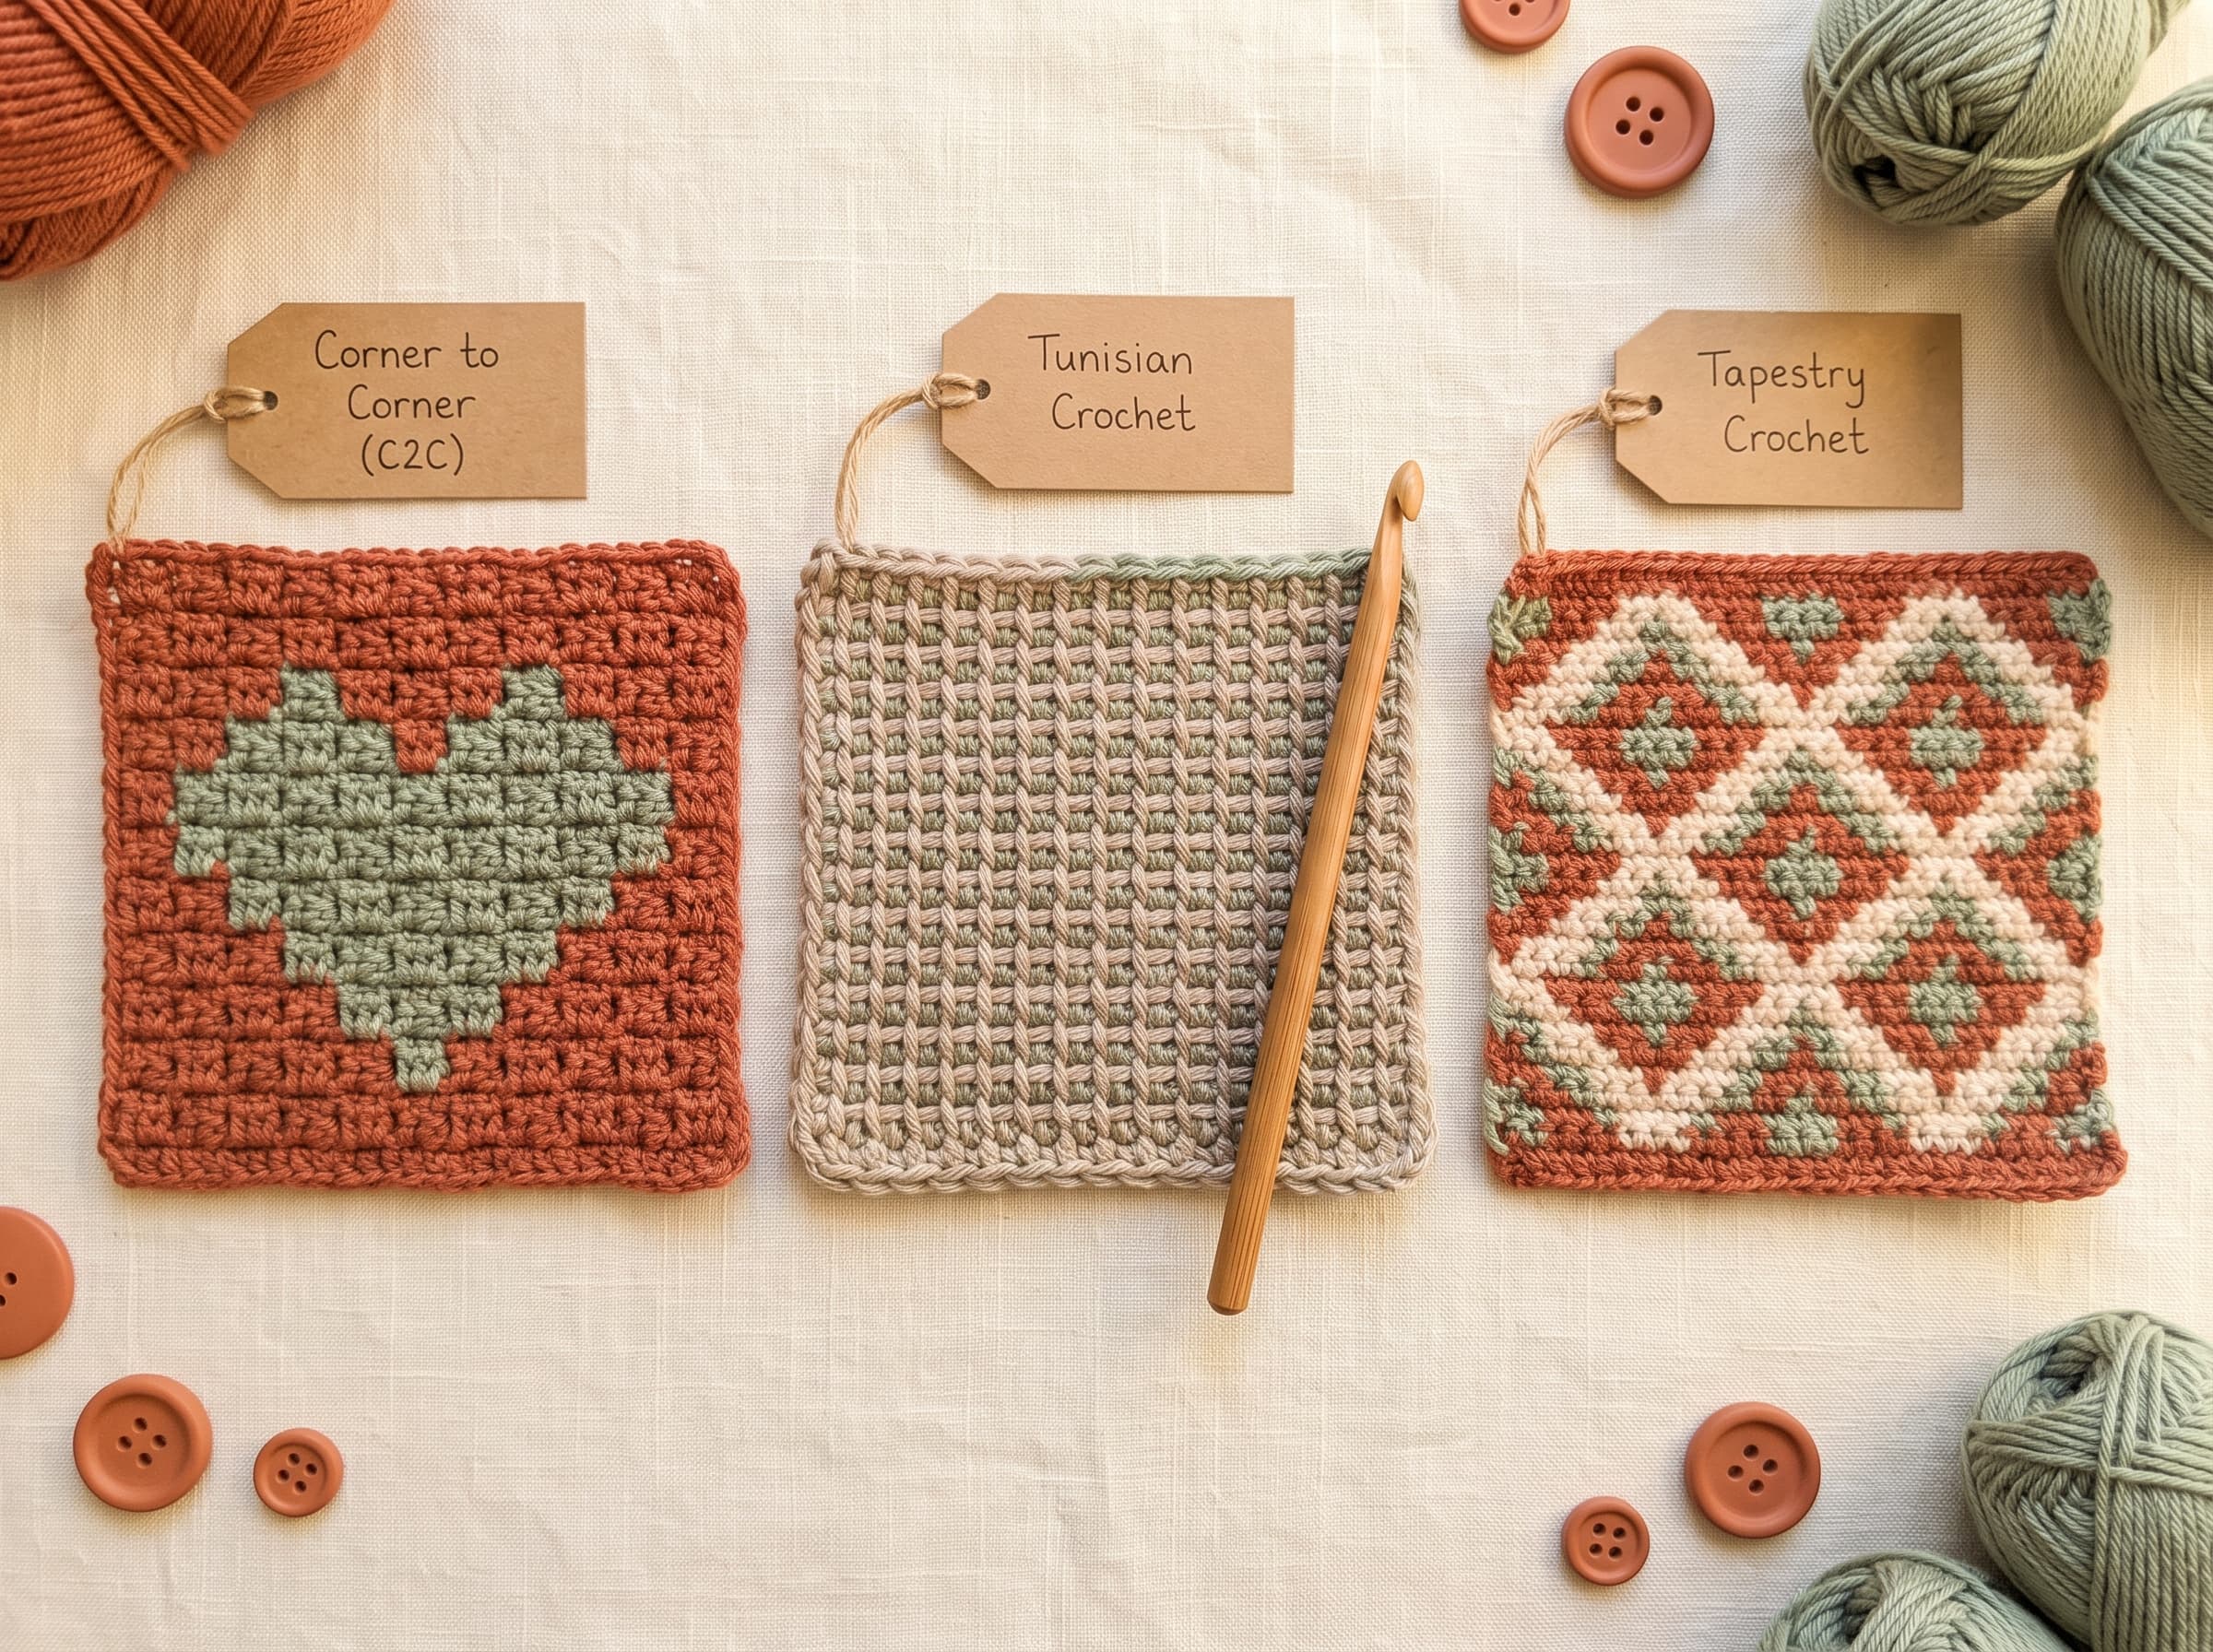
Corner to corner (C2C)
Instead of working in straight rows, C2C builds your project on the diagonal, growing from one corner outward in little blocks. It sounds odd and clicks fast once you try it. Its superpower is pixel-art designs: because each block is one “pixel,” you can crochet graphs, letters, and pictures into blankets. If you’ve ever seen a crochet blanket with a whole image on it, it was very likely C2C.
Full tutorial: Corner to Corner (C2C) Crochet(soon)Tunisian crochet
A hybrid that sits halfway between crochet and knitting. You use a long hook (often with a stopper on the end) and keep all your loops on the hook at once, working a row in two passes instead of one. The result is a dense, woven, almost-knitted fabric with gorgeous texture. It feels different enough that it’s worth treating as its own little adventure.
Full guide: Tunisian Crochet for Beginners(soon)Tapestry crochet
This is how you crochet with multiple colors in the same row to make patterns, shapes, and motifs, carrying the unused color along inside your stitches until you need it. It’s the technique behind colorful bags, baskets, and graphic wall hangings. Once you can change colors cleanly, a whole world of design opens up.
That’s the full map of crochet stitches, from your first chain to color pictures on a blanket. Two quick but important things left before you start: tension, and reading a pattern.
Tension & gauge
Here’s the thing nobody likes hearing but everyone learns eventually: how tightly you crochet matters as much as which stitch you use. Two people can follow the same pattern with the same yarn and same hook and end up with hats two sizes apart. The difference is tension.
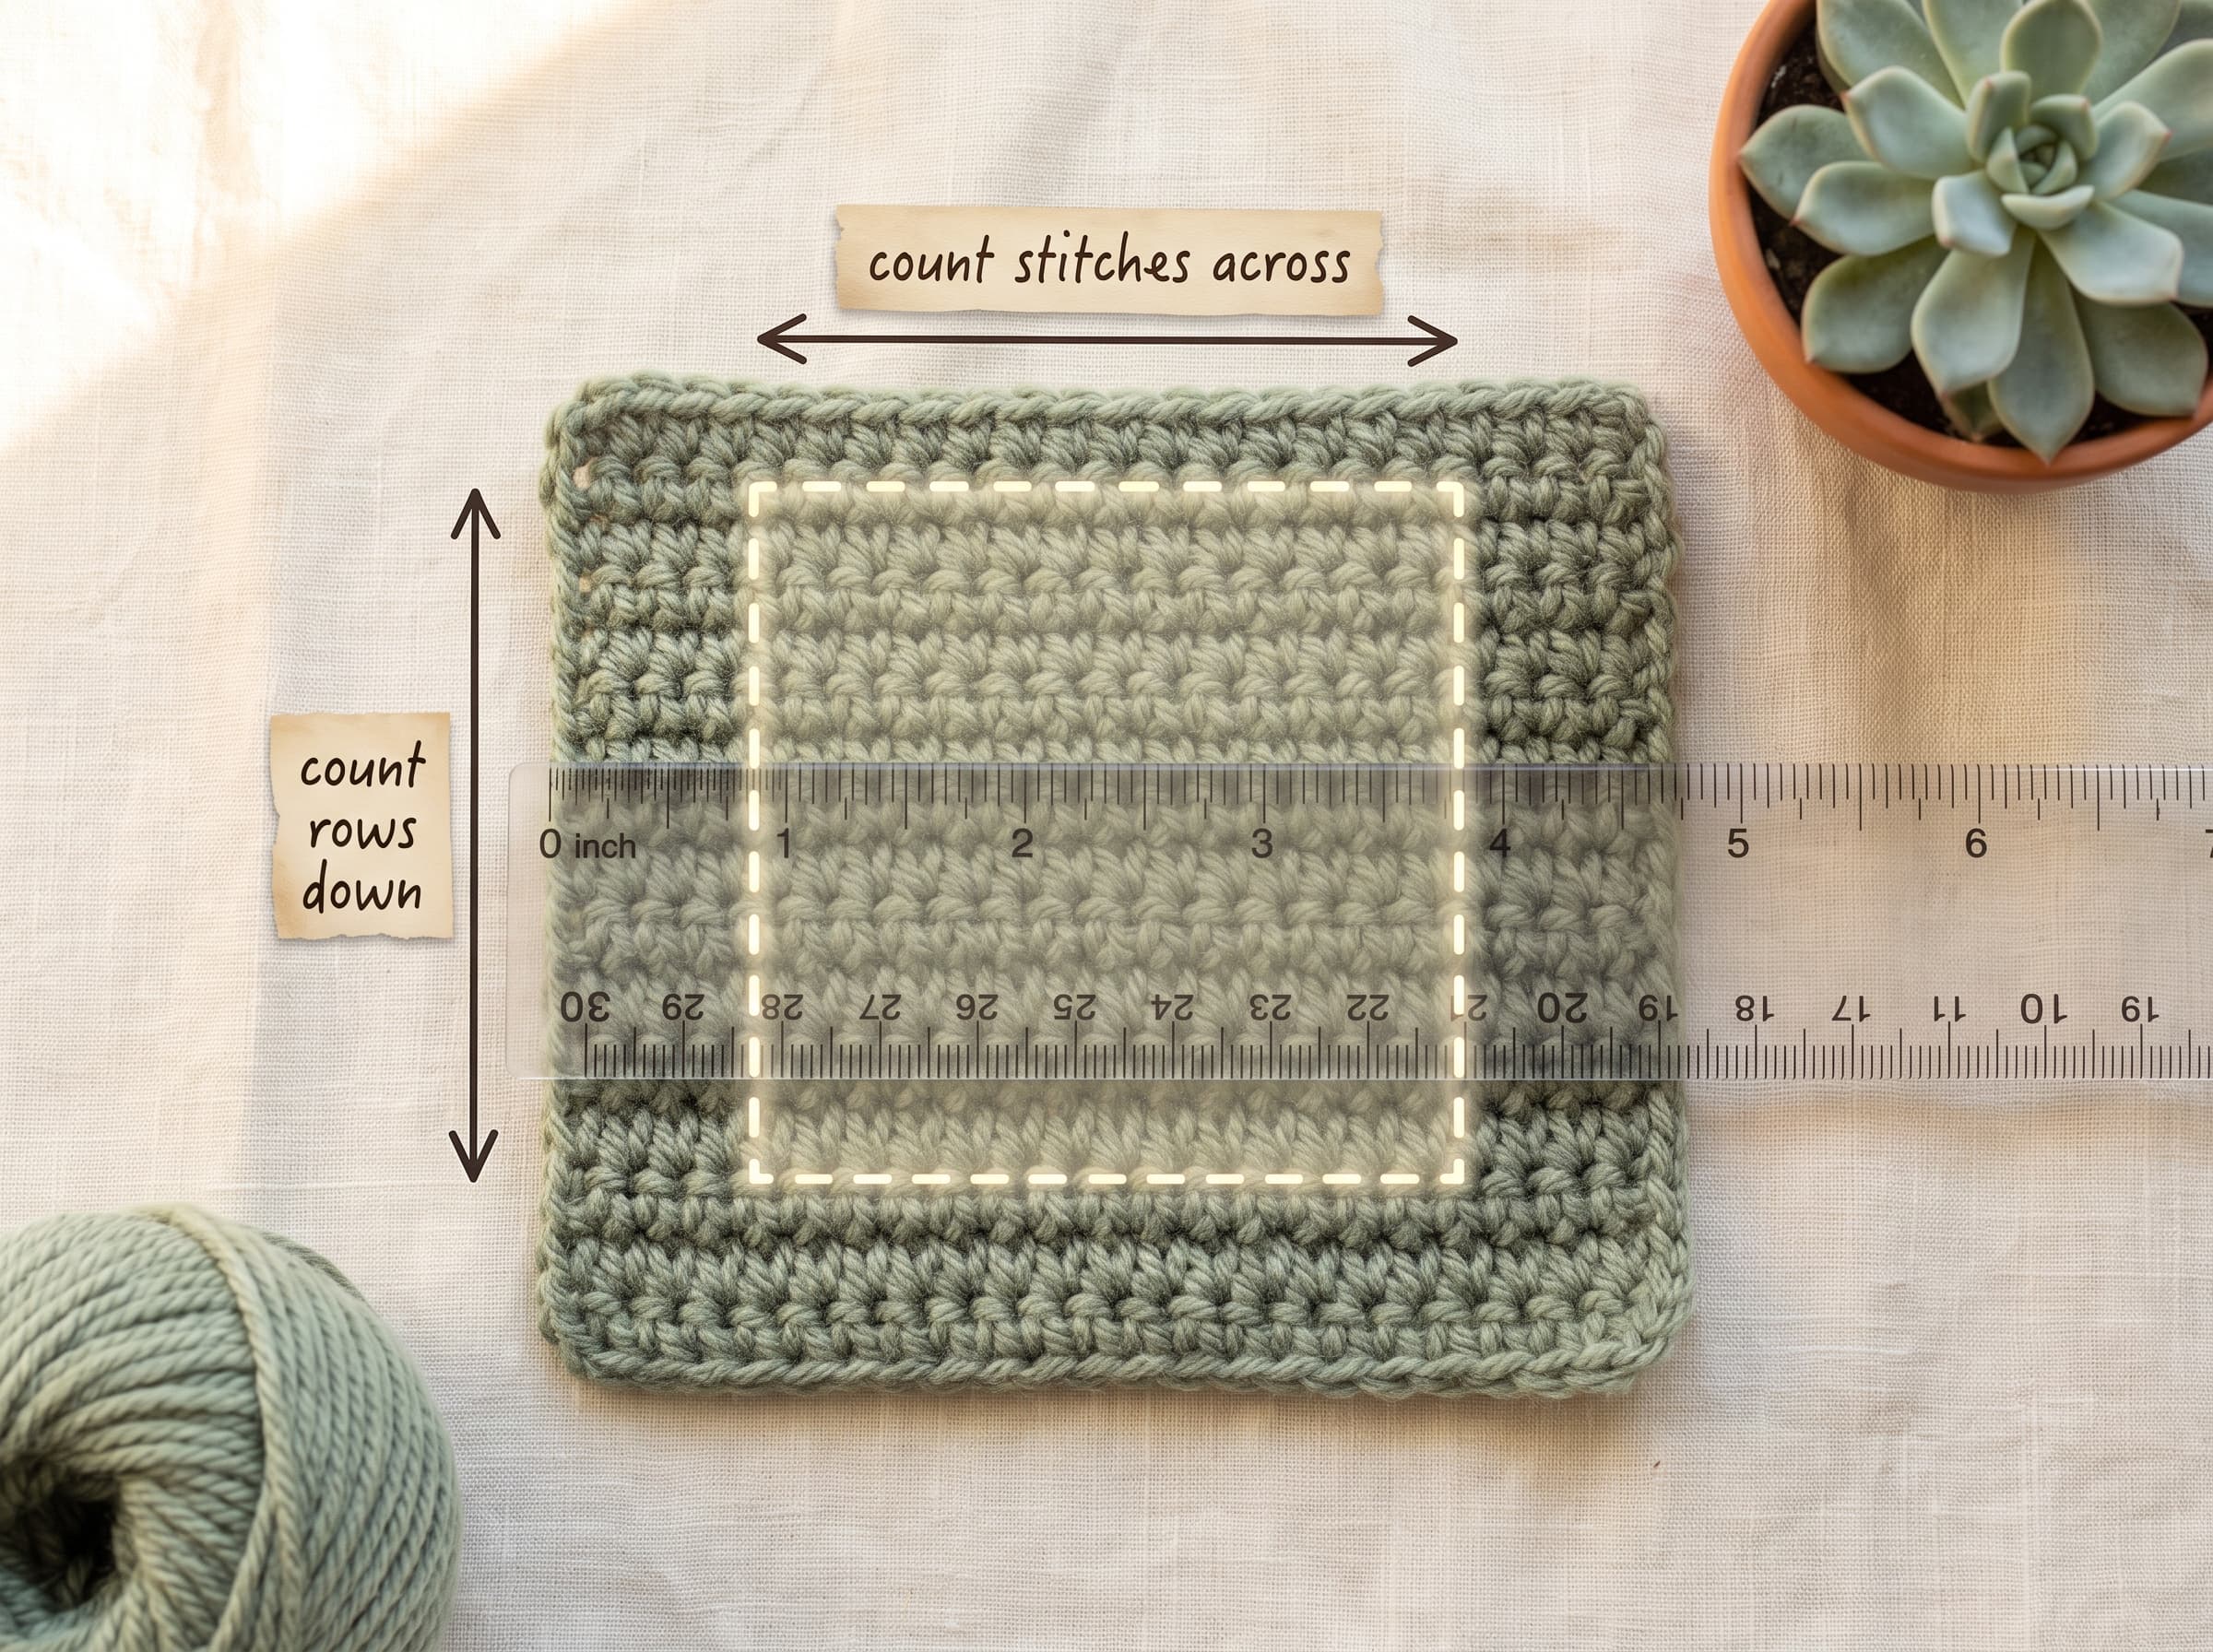
Tension is how loose or tight you pull your yarn as you stitch. Gauge is the measurable result: how many stitches and rows fit into a set space, usually a 4 inch (10 cm) square. (Remember the US/UK thing from earlier: US patterns say gauge, UK patterns say tension, same idea.)
Why you should care
For scarves and blankets, tension barely matters, make it, enjoy it. But the moment size matters, like a hat that has to fit a head or a sweater that has to fit you, gauge is everything. Crochet a little tighter than the pattern designer and your finished piece comes out too small. A little looser and it’s too big. Nothing in the instructions will warn you, because the stitches are technically “correct.”
How to check your gauge (the swatch)
This is the part beginners love to skip and later wish they hadn’t. Before a size-critical project, crochet a small sample, a gauge swatch, in the pattern’s stitch, then lay a ruler across it.
- 1Make a swatch a bit bigger than 4 inches square in the stitch the pattern uses.
- 2Lay it flat (don’t stretch it) and measure a 4 inch (10 cm) section.
- 3Count the stitches and rows inside it.
- 4Compare to the pattern’s stated gauge.
Too many stitches in 4 inches? You’re crocheting tight, go up a hook size. Too few? You’re loose, go down a hook size. Then swatch again. You change the hook, not how you naturally stitch.
Get tension under your belt and you can trust your projects to come out the size you expect. Last stop: actually reading a pattern.
How to read a stitch in a pattern
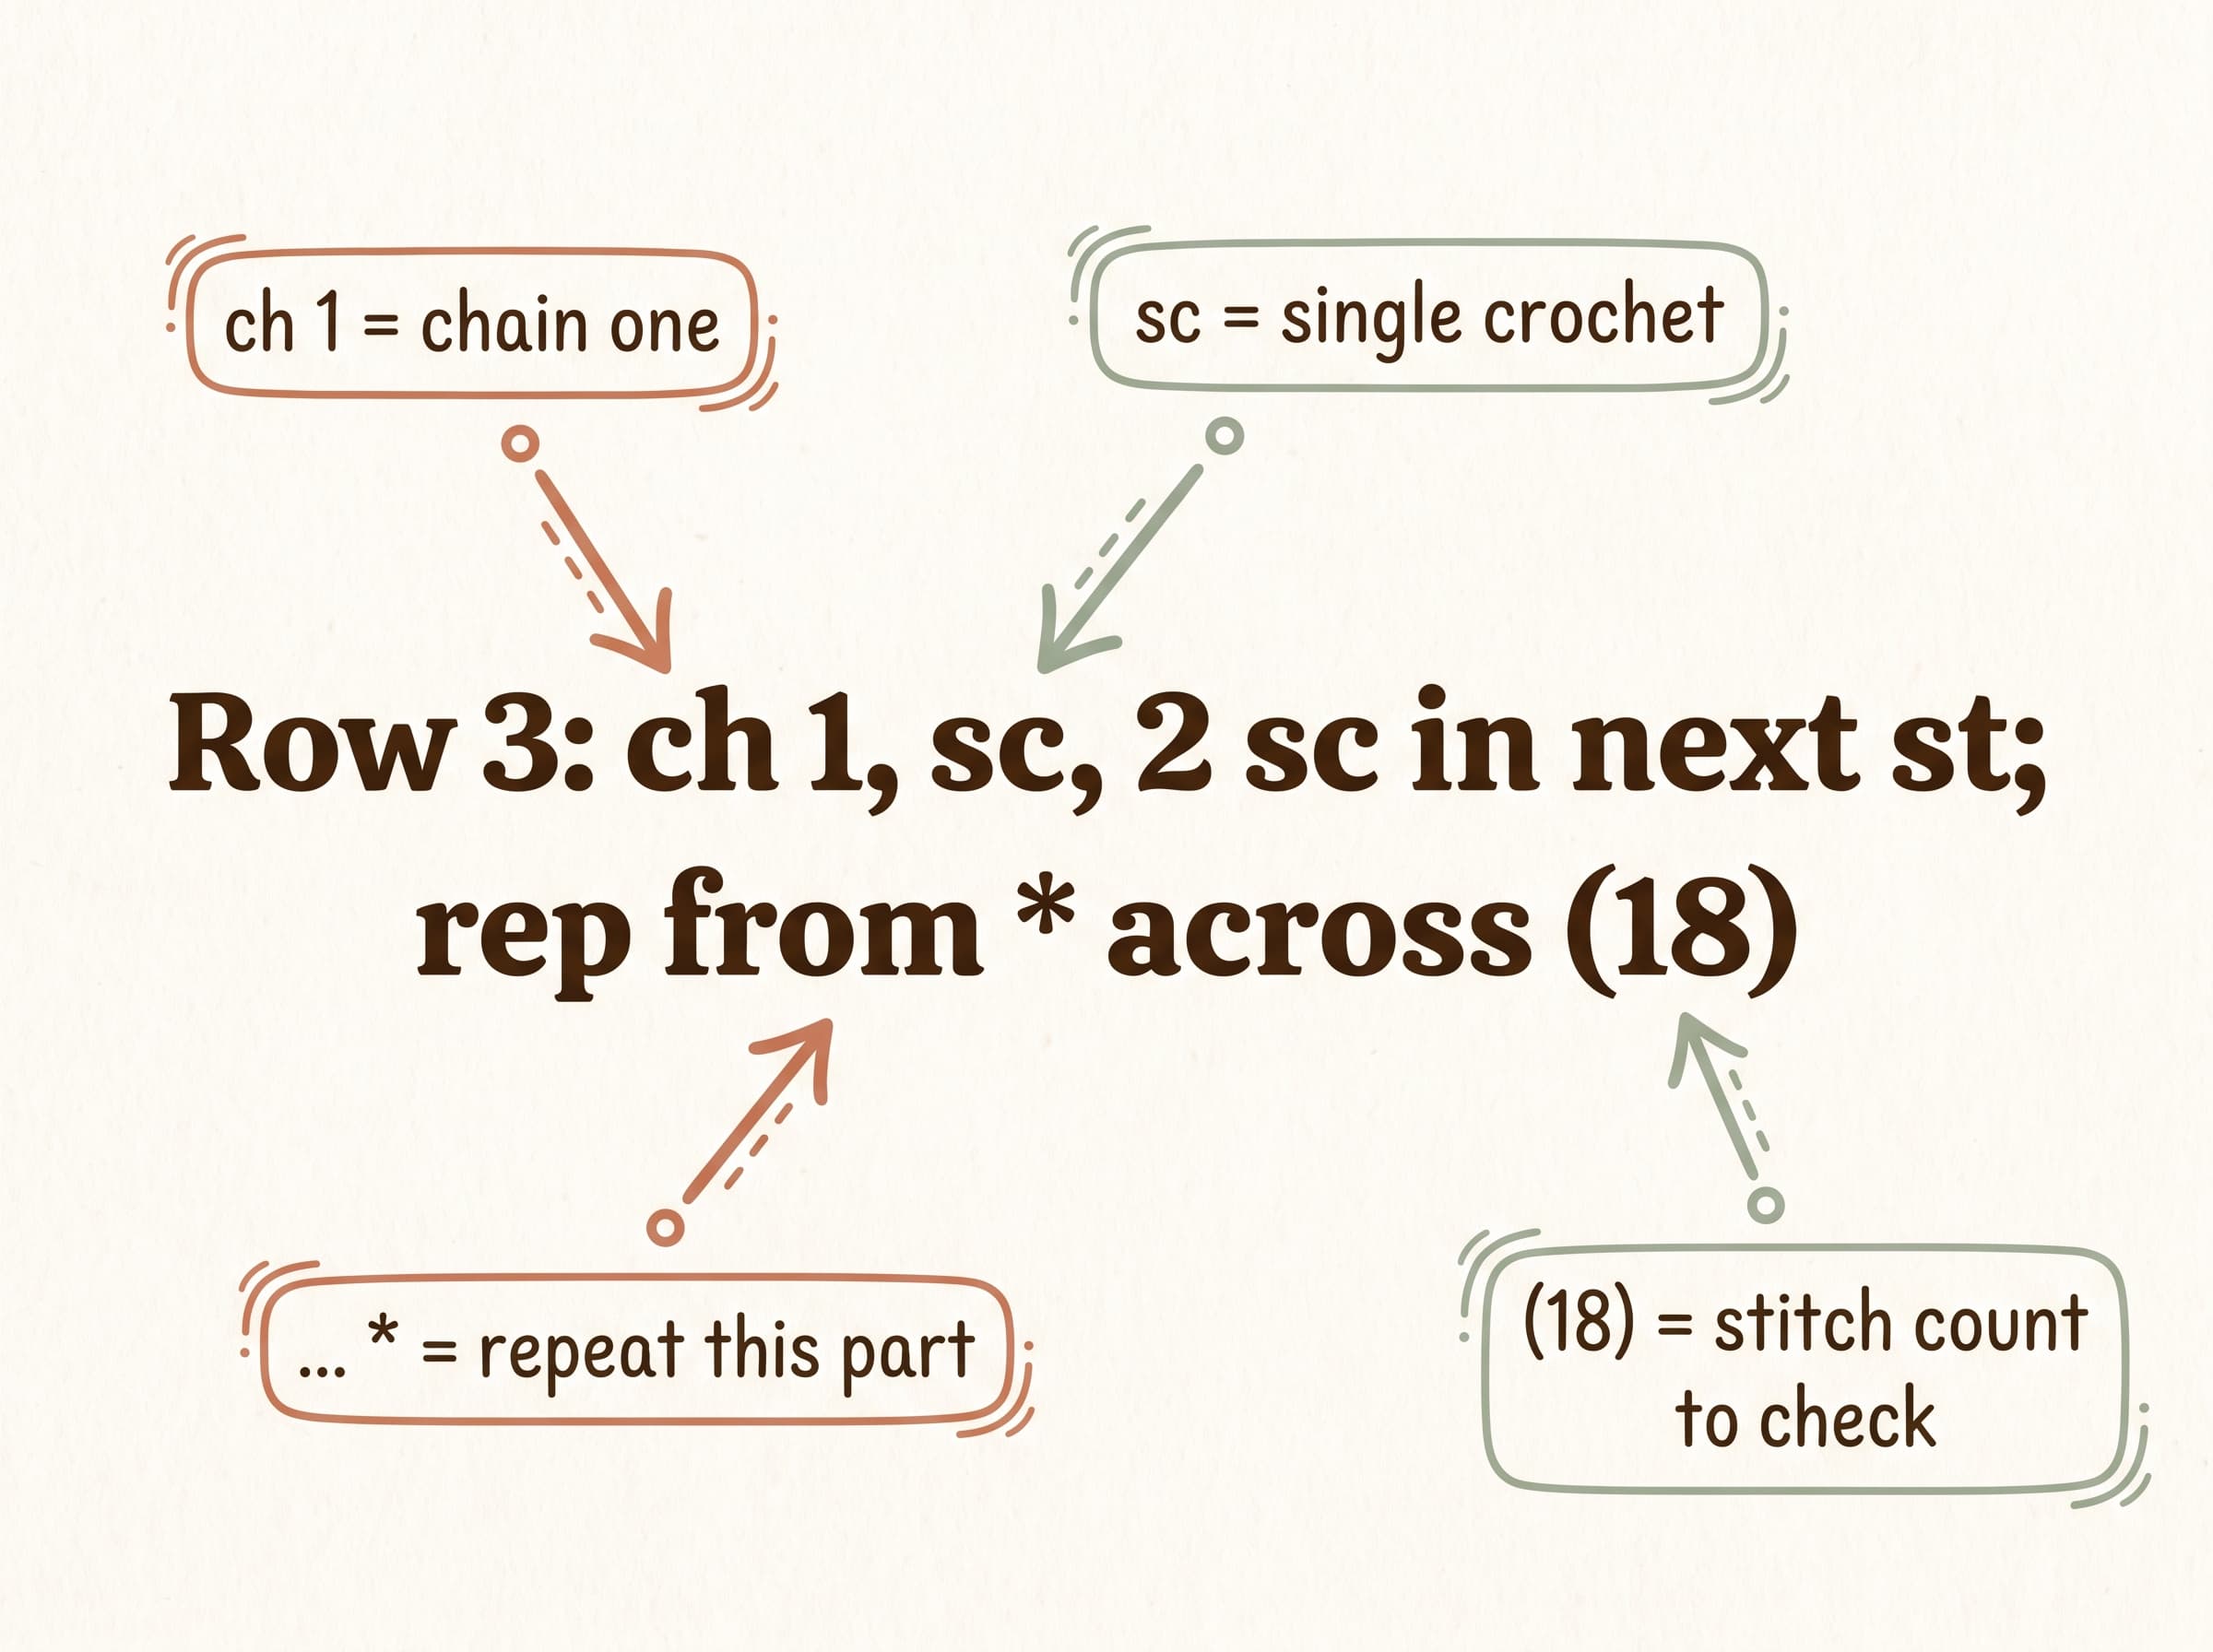
The first time you open a crochet pattern, it looks like a cat walked across a keyboard: “Row 3: ch 1, *sc, 2 sc in next st; rep from * across (18).” Don’t panic. It’s not a secret code, it’s shorthand, and once you know the handful of abbreviations, you can read almost anything.
Stitches are abbreviated
Every stitch you’ve learned has a short code. These are the ones you’ll see constantly:
| Abbreviation | Stitch |
|---|---|
| ch | chain |
| sl st | slip stitch |
| sc | single crochet |
| hdc | half double crochet |
| dc | double crochet |
| tr | treble crochet |
| st / sts | stitch / stitches |
| rep | repeat |
| sk | skip |
| yo | yarn over |
So “dc in next st” just means “make one double crochet in the next stitch.” That’s all. (And remember: these are US abbreviations. A UK pattern’s “dc” means something different, so always check which system the pattern uses.)
The two symbols that trip everyone up
Two bits of punctuation do a lot of heavy lifting in patterns:
- Asterisks * * mark a section to repeat. “*sc, 2 dc; rep from *” means “do everything from the asterisk again across the row.” It saves the designer writing the same thing forty times.
- Numbers in (parentheses) at the end of a row tell you how many stitches you should have when you’re done. “(18)” means count your row, you want 18. It’s a built-in checkpoint, use it.
And that’s it, you can now recognize every stitch, work it, size it, and read it in a pattern. The only thing left is the best part: deciding what to make.
What to make next
You’ve got the whole map now: the basic four, the textures, the decorative stitches, plus tension and pattern-reading. The fastest way to make it all stick is to use it on something small and finishable. Pick a quick win, finish it, and the confidence carries into the next project.
A few beginner-friendly starting points:
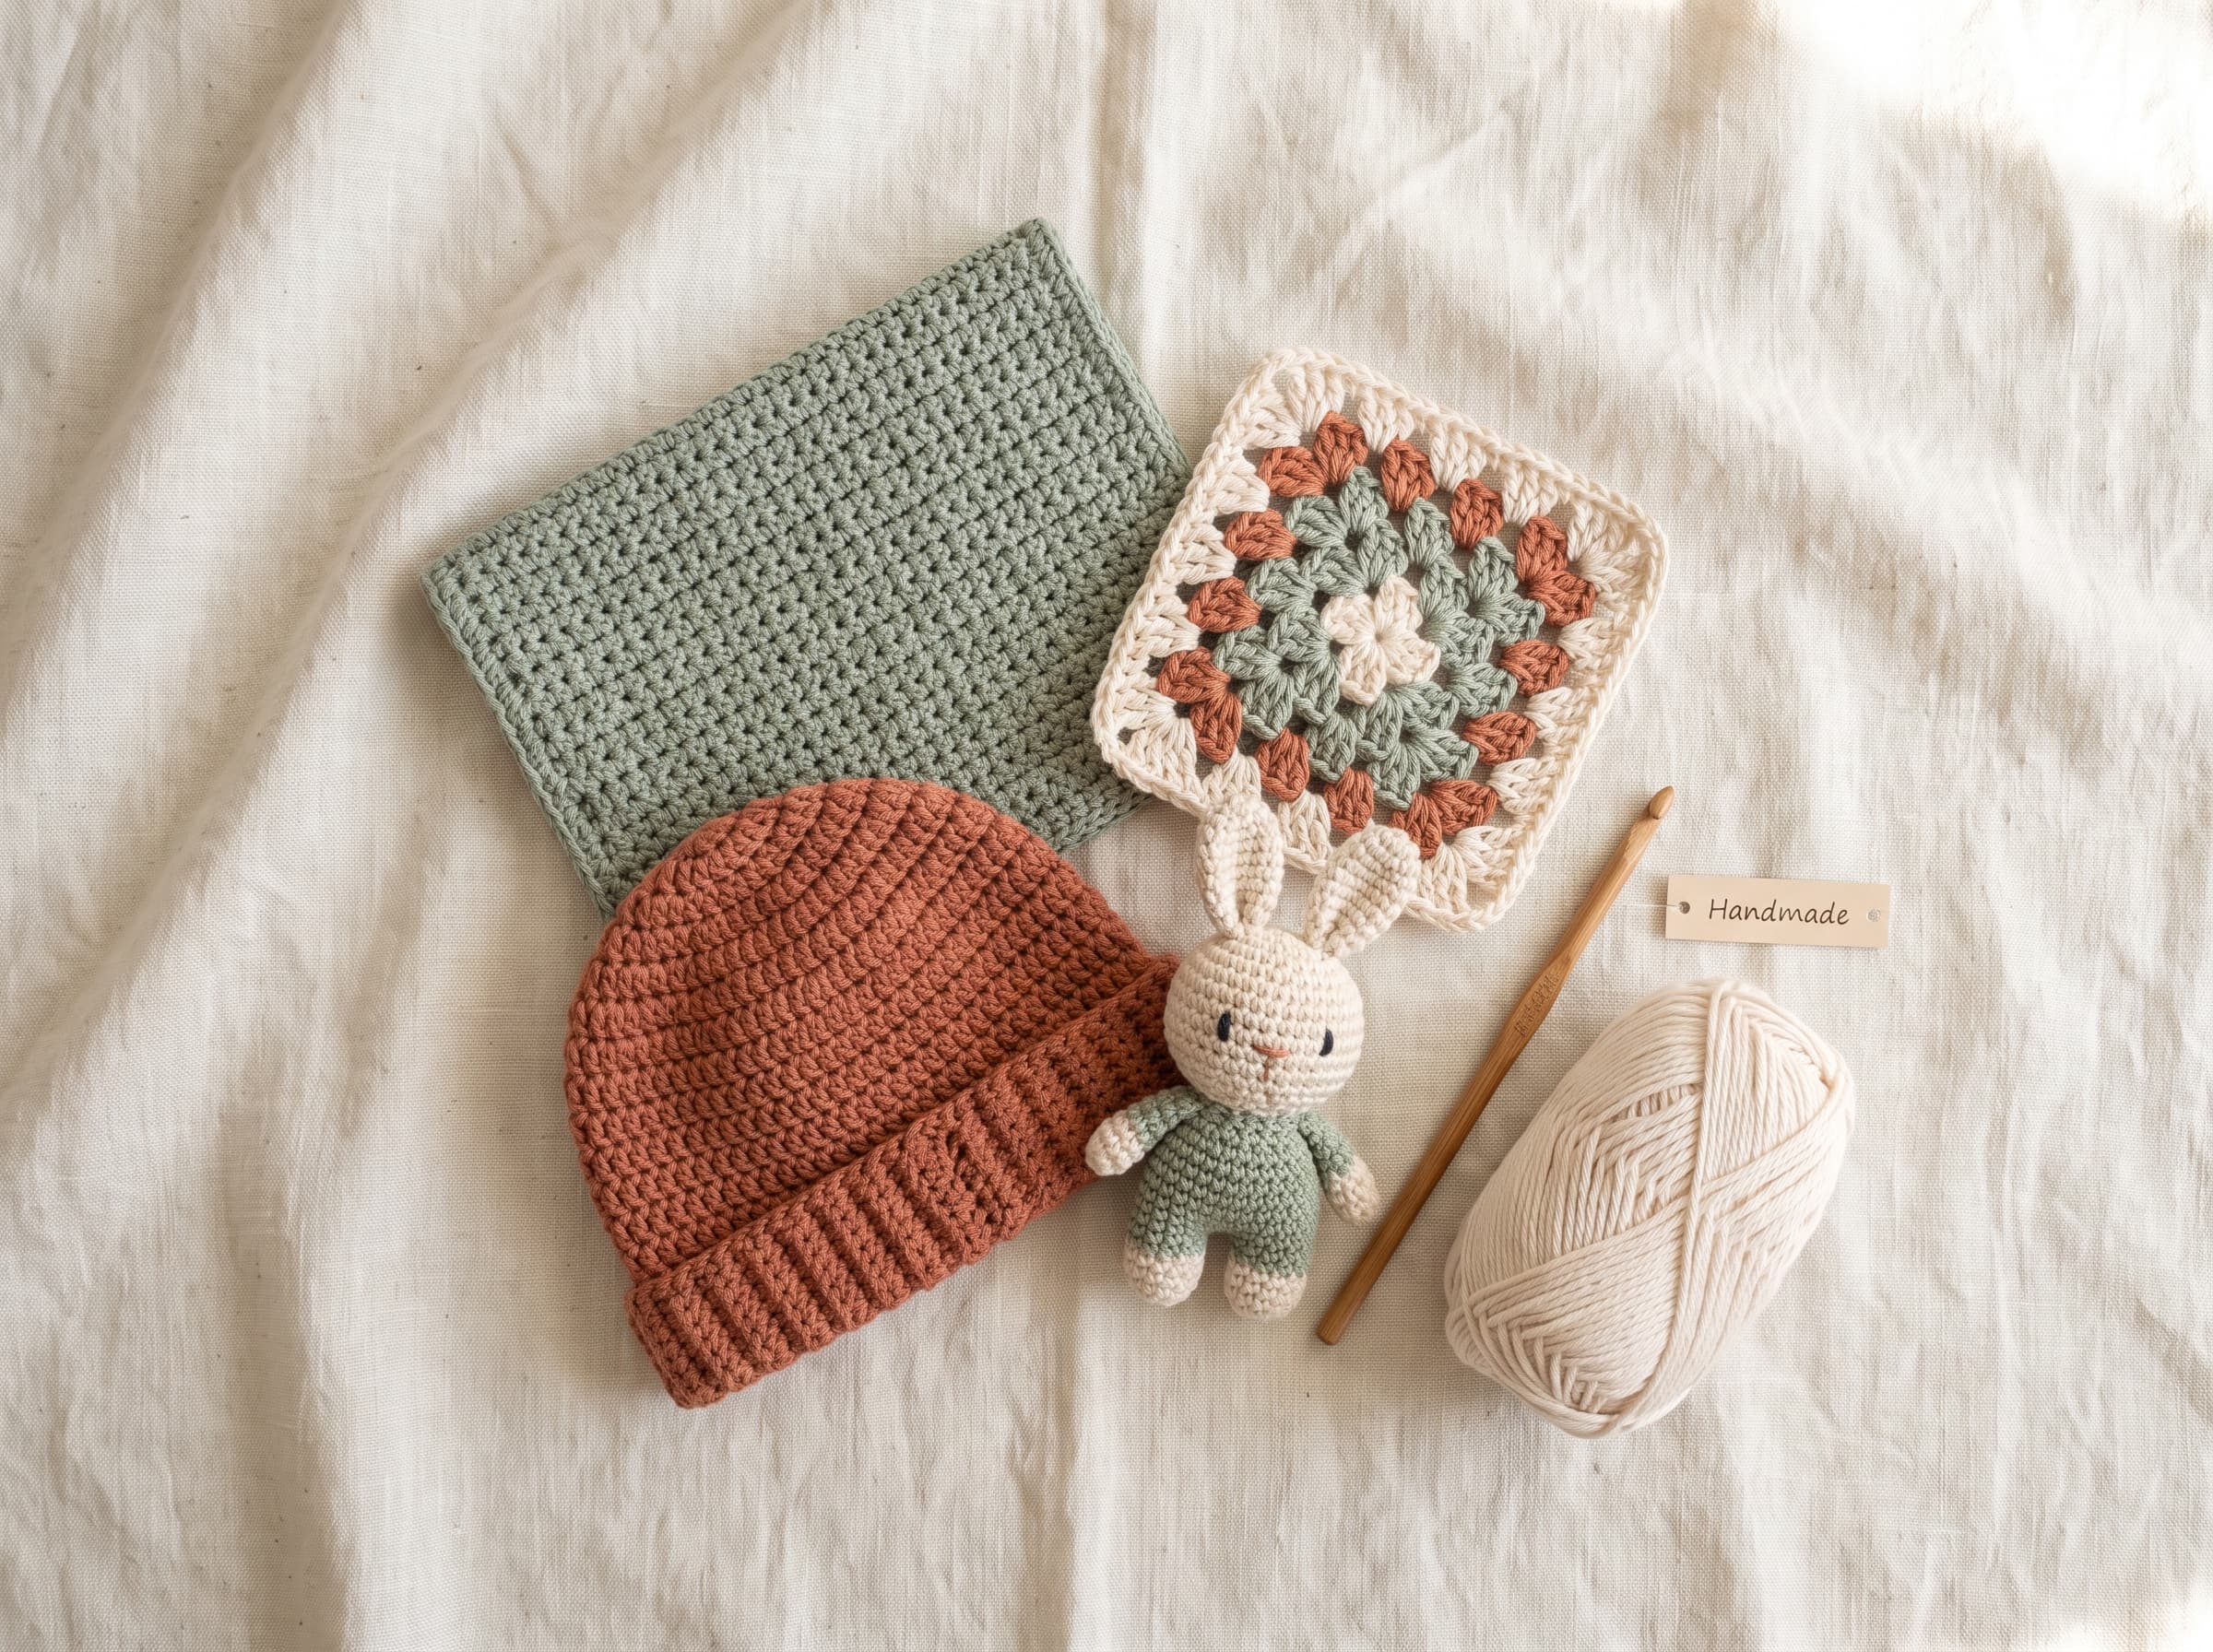
- A simple washcloth — practice even rows and tidy edges in an hour.
- A granny square — learn the icon, then turn a pile of them into a blanket.
- A beginner beanie — your first wearable, and it makes a great gift.
- A mini amigurumi — try working in the round with one tiny, cute make.
Browse all our free beginner crochet patterns and pick one to try today.
Frequently asked questions
Get the free printable Crochet Stitch Guide
A one-page printable cheat sheet of every stitch in this guide. Print it and keep it by your hook.
- ✓Instant PDF download
- ✓Beginner-friendly
- ✓No spam, ever